

Fly tying tutorial by Aaron E. Fleming
Around mid-January every year, I grew up hearing my dad say that the upcoming February 2nd’s US holiday, Groundhog Day, was his favorite holiday – there was nothing to celebrate, no gifts were to be expected, and he “got to see if this was the year that furry little bastard bit the hand of his captor.” Exciting times, growing up in my house outside of Pittsburgh, PA.
A former DOD employee turned USPS employee, I’m sure that making holidays memorable with gifts and good times in a small and economically depreciating steel mill town was a challenging prospect for a family man on a single salary in the ’80s. Thus my interest in bamboo cane fishing began with him, fishing the bluegill and other panfish from the banks of Sugar Creek in Pleasant’s Co., West Virginia, or some long-forgotten pond locations in eastern Ohio.
So here’s to my dad and to that little dubbing factory in Punxsutawney who we all enjoy glancing at on the news once a year. I’m likely one of very few people with specific memories associated with this holiday!

Hoping for good news from the groundhog this year, a customer of mine named Ian in Chicagoland contacted me recently expressing a desire to do a little tenkara rod fishing for some very small grass pickerel that he discovered in his area. We came up with this little size 20 Ishigaki tied on a barbless emerger – entirely his design and concept, solely my craftsmanship.
He went for a double color thread tie in Doc Blue in 6/0 and Blue Wing Olive in 6/0 with 6-9 fibers of golden pheasant cape for a tail. I included a small gold wire abdominal wrap for segmentation and weight. Next, I added a thorax of Senyo’s light olive laser dubbing by creating a divided-thread dubbing loop. After three or so wraps of the thin dubbing noodle, I tied in a collar made from golden Phoenix hackle. (Phoenix will be difficult to find unless you’re raising your own or know someone who does – sub for ginger dry hackle of appropriate length.)
To prepare the Phoenix for the tip tie-in, I first removed all the fibers (North Country Spider style) on the side of the rachis that will be making direct contact with the hook shank. This allows for a sparser hackle tie and more controlled fiber management for the stiller waters where these particular pickerel live. Finally, I performed a 2-turn whip finish behind the hackle, sakasa style, and ended with a tiny dab of head cement on the bottom knot.


Ian and I enjoyed discussing the challenges of tying for smaller fish and fly development in general when targeting a specific species. Conversations about stalking the “grass pickles” eventually led to the development of this Golden Gherkin, which brings us joy of sharing it with the rest of the tenkara and tying community!
Tying Instructions
The only thing difficult about tying this fly is the volume of materials used against the size of the hook. For the photos in this article, I tied the Golden Gherkin on a size 14 for iPhone-photography-sans-macro-lens purposes. Remember: less is more, slow is smooth, patience is paramount.
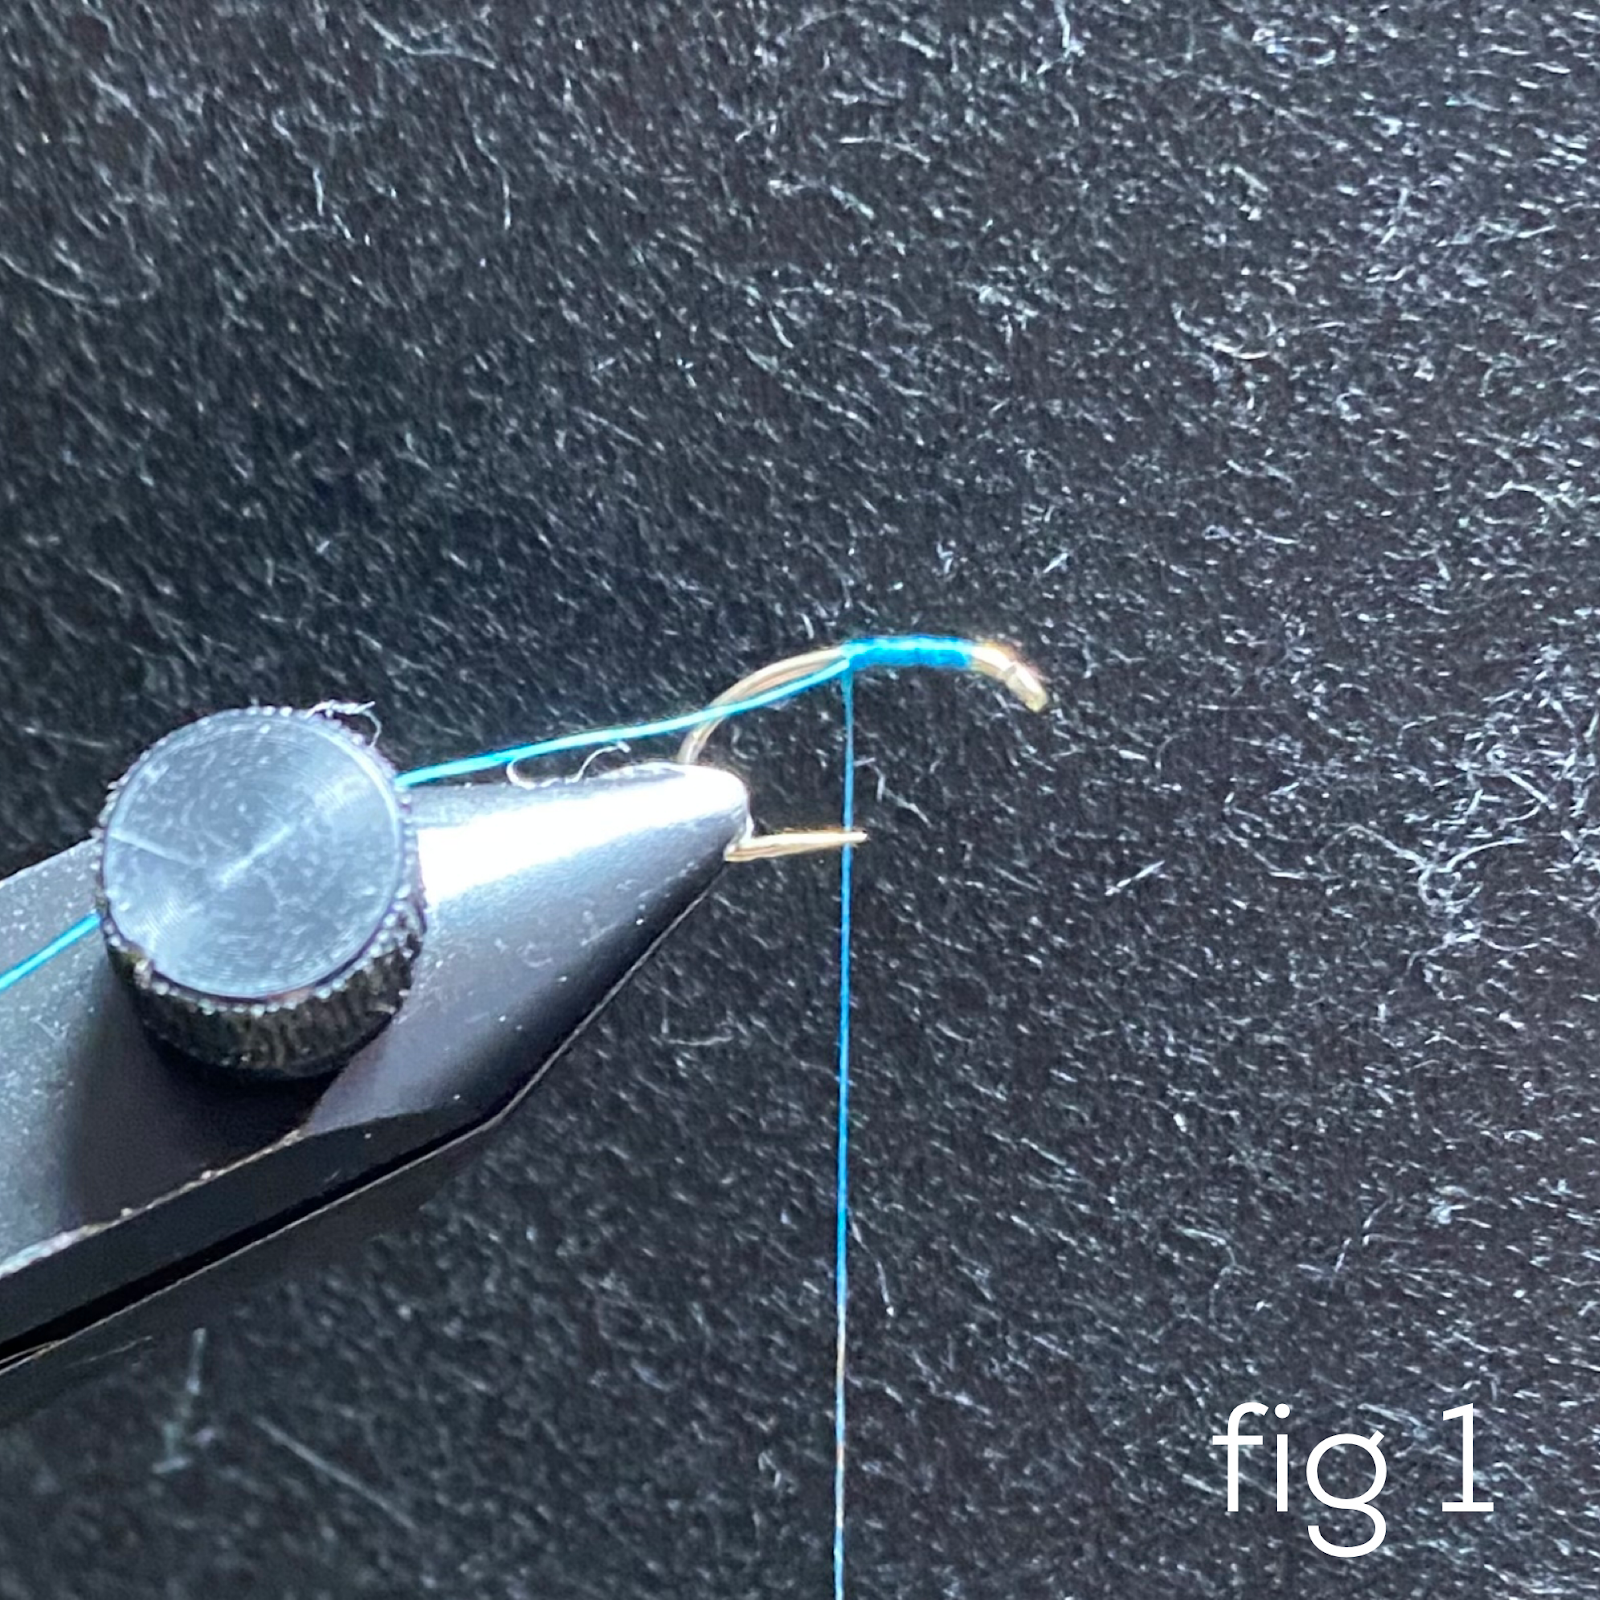
FIG 1 – I like to start the rear color a little behind the hook eye just to lay a stable base for the following application of the golden pheasant tail.
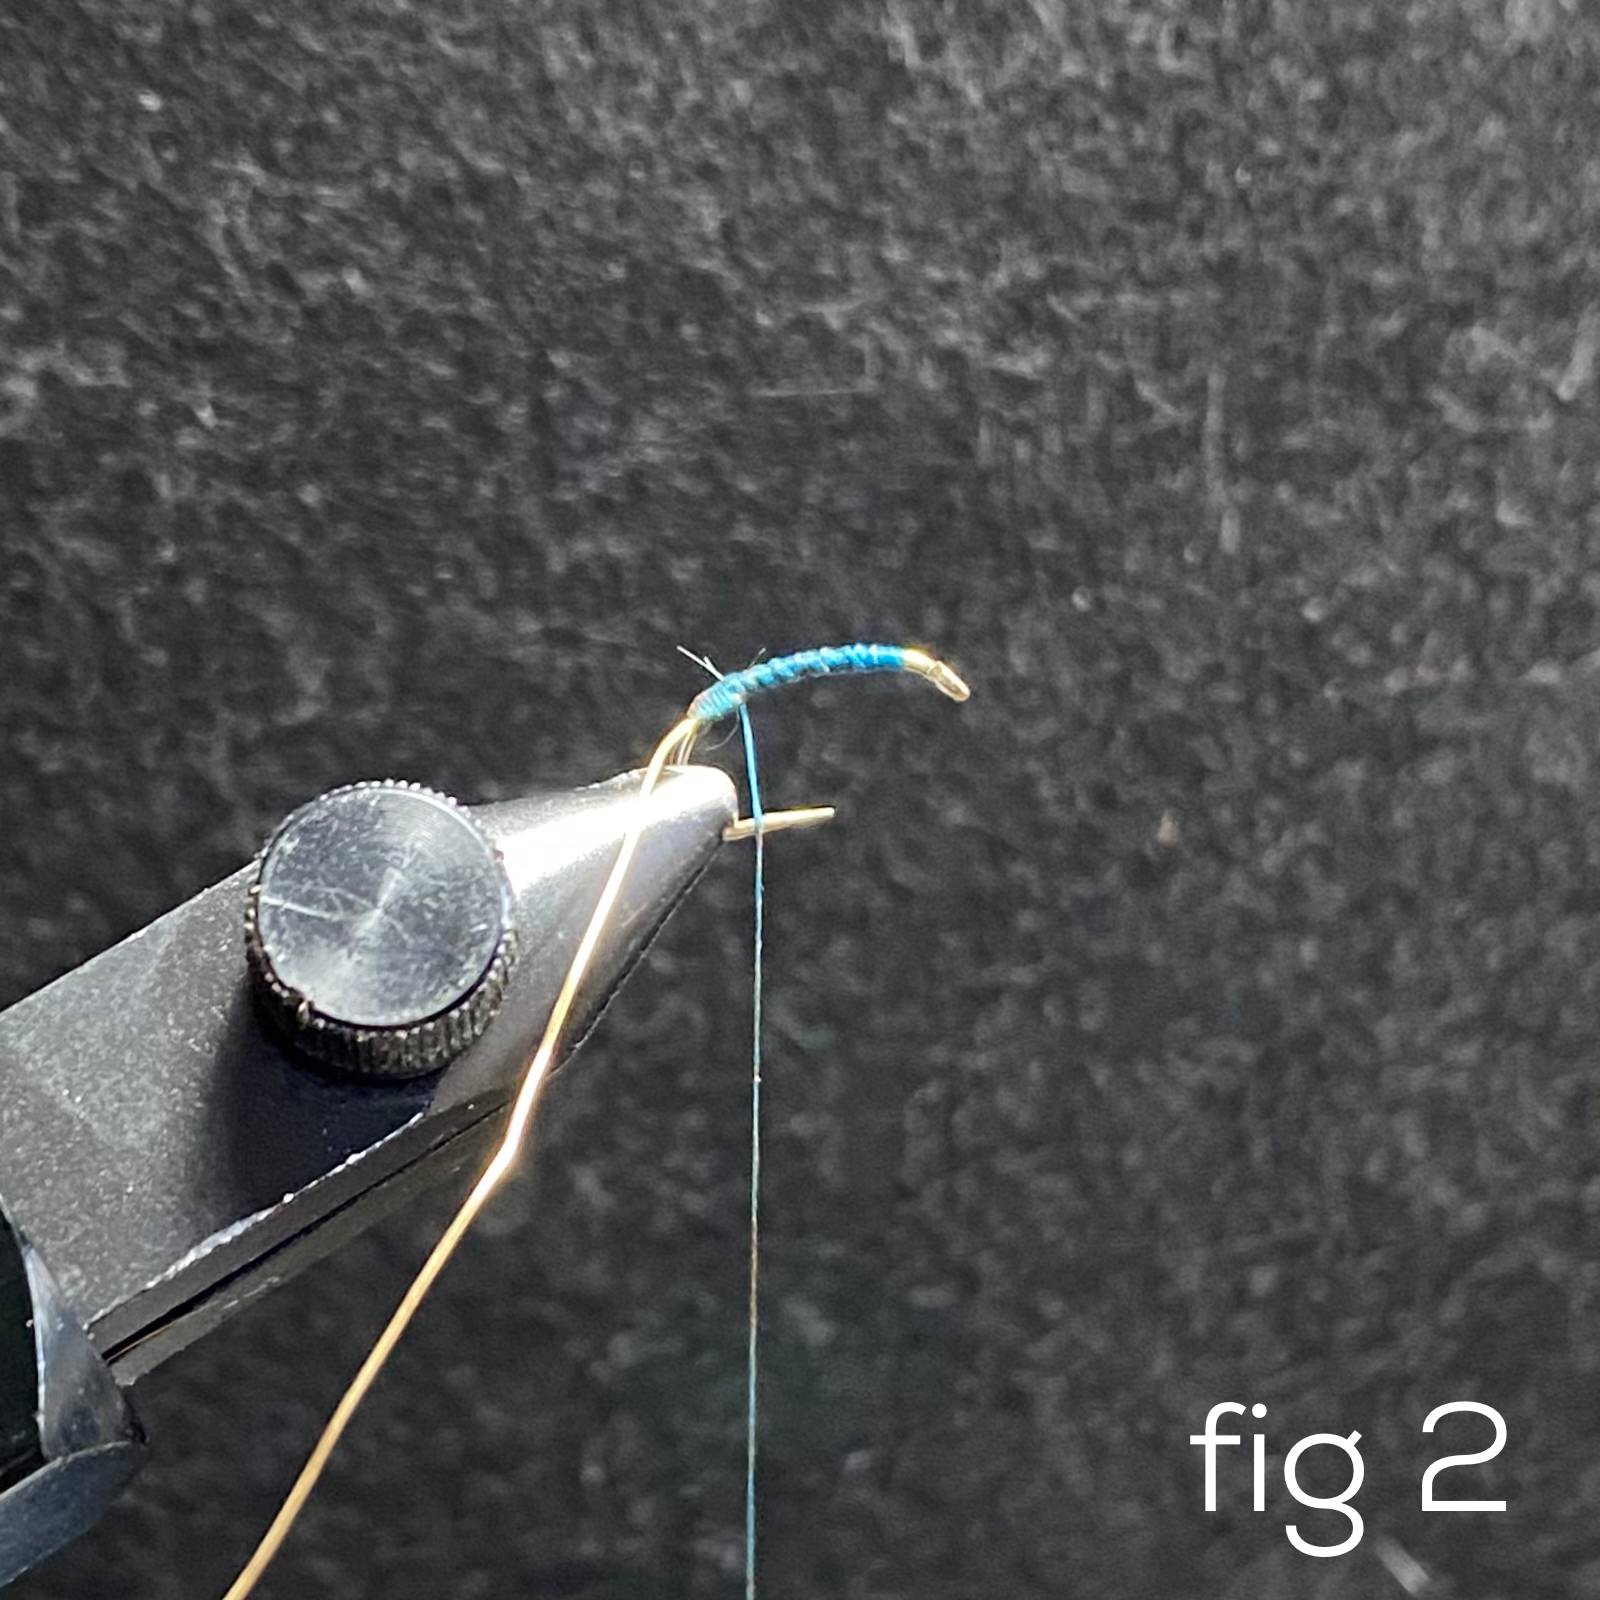
FIG 2 – Tie in your gold wire. I put a wrap or two around the front and back for extra security. Then I wrap the rear of the abdomen with the thread until the width of the gold wire against the hook shank is compensated for in wraps of thread. This also gives my body an appropriate point of reference from which to balance the rest of the taper.
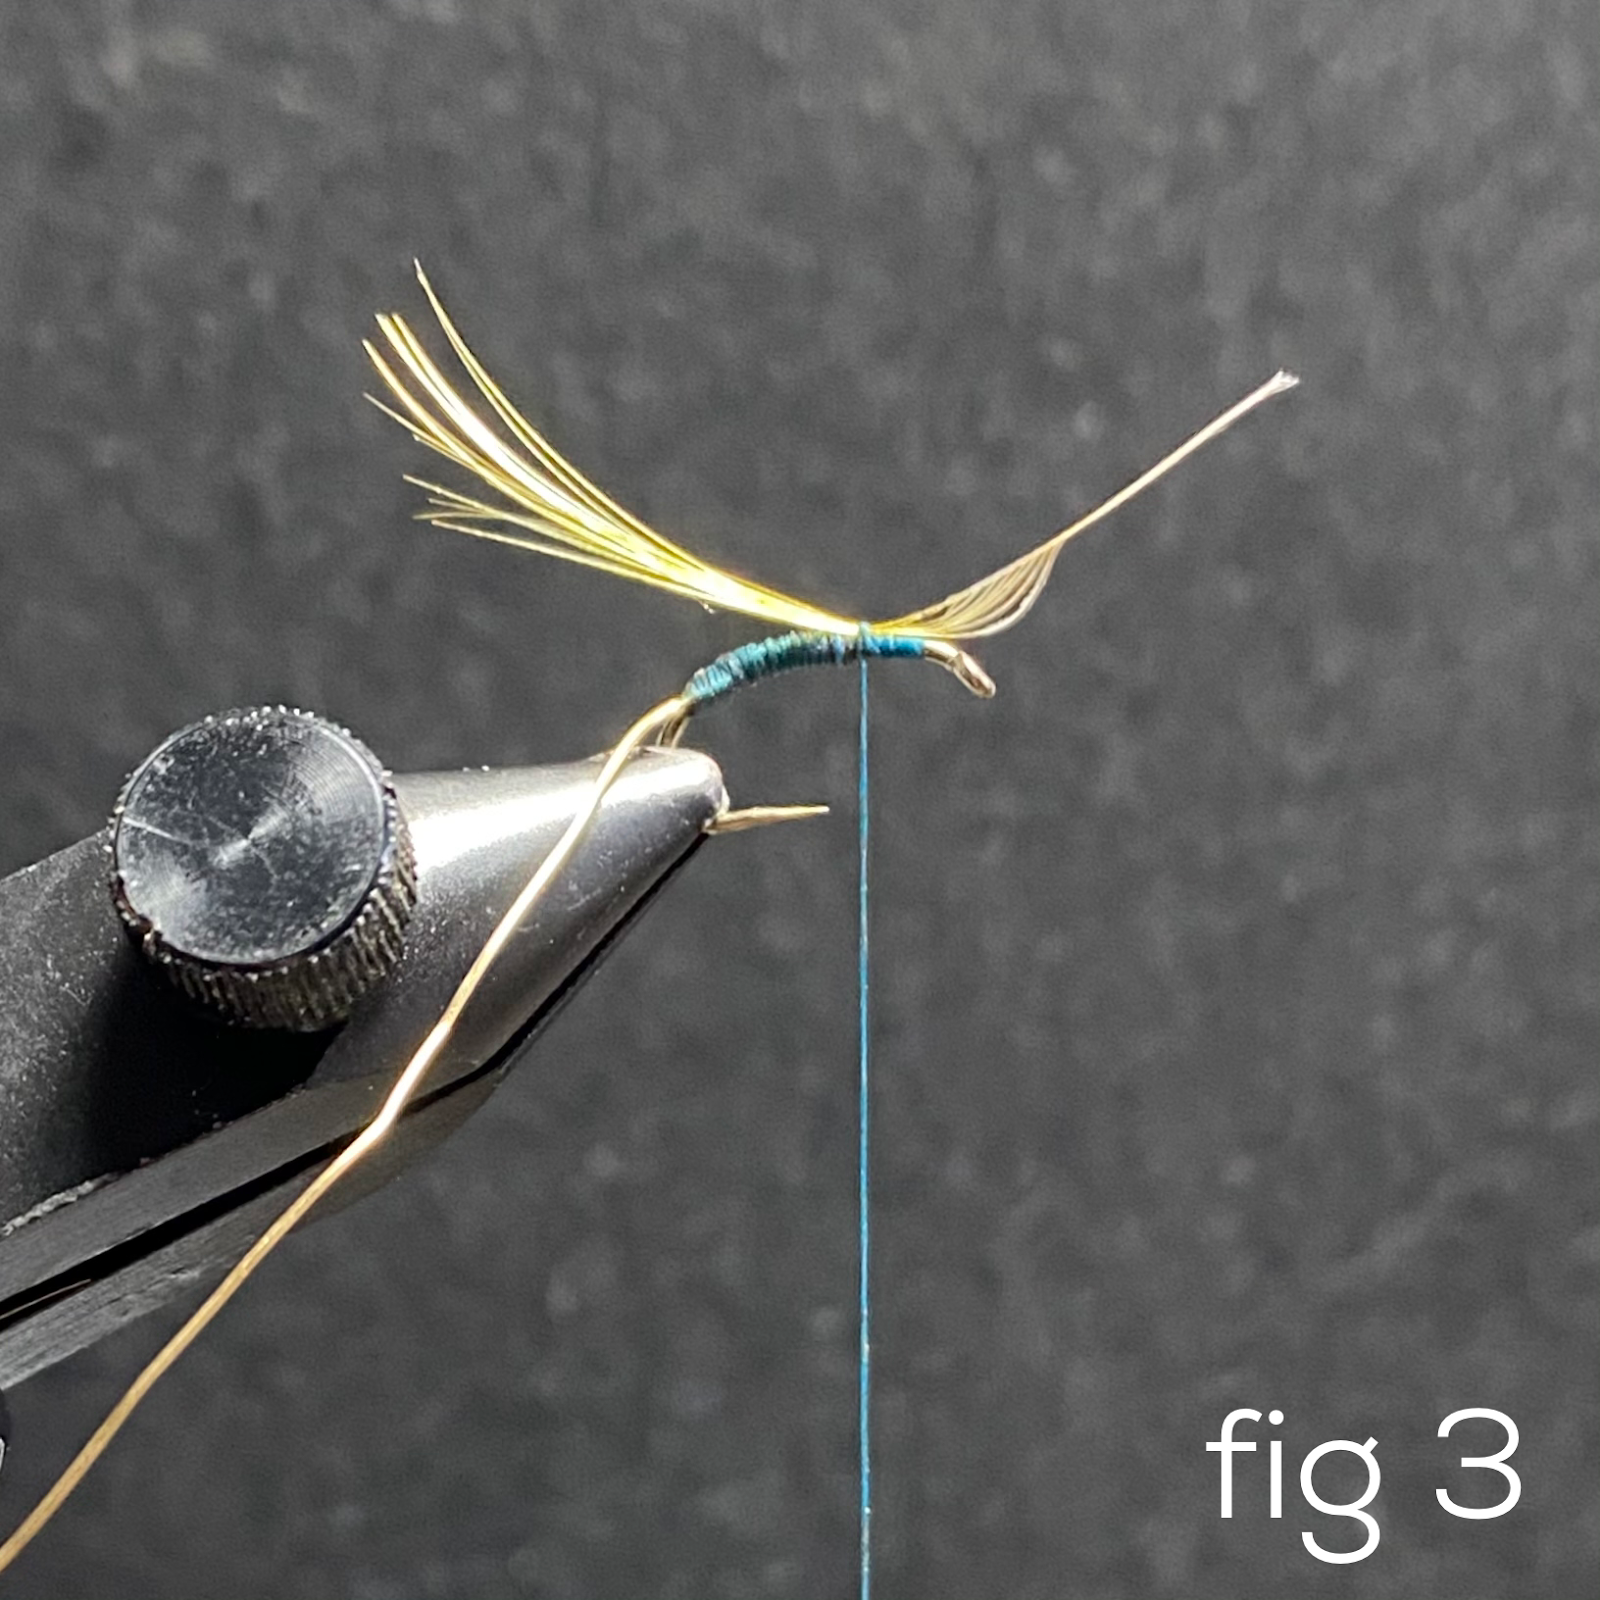
FIG 3 – Bring your thread up to about a third of a hook’s length behind the hook eye and secure your golden pheasant tail fibers with the natural curve pointing up and away from the hook point. The feathers should ride along the top of the hook shank.

FIG 4 – Secure and trim your butt ends.
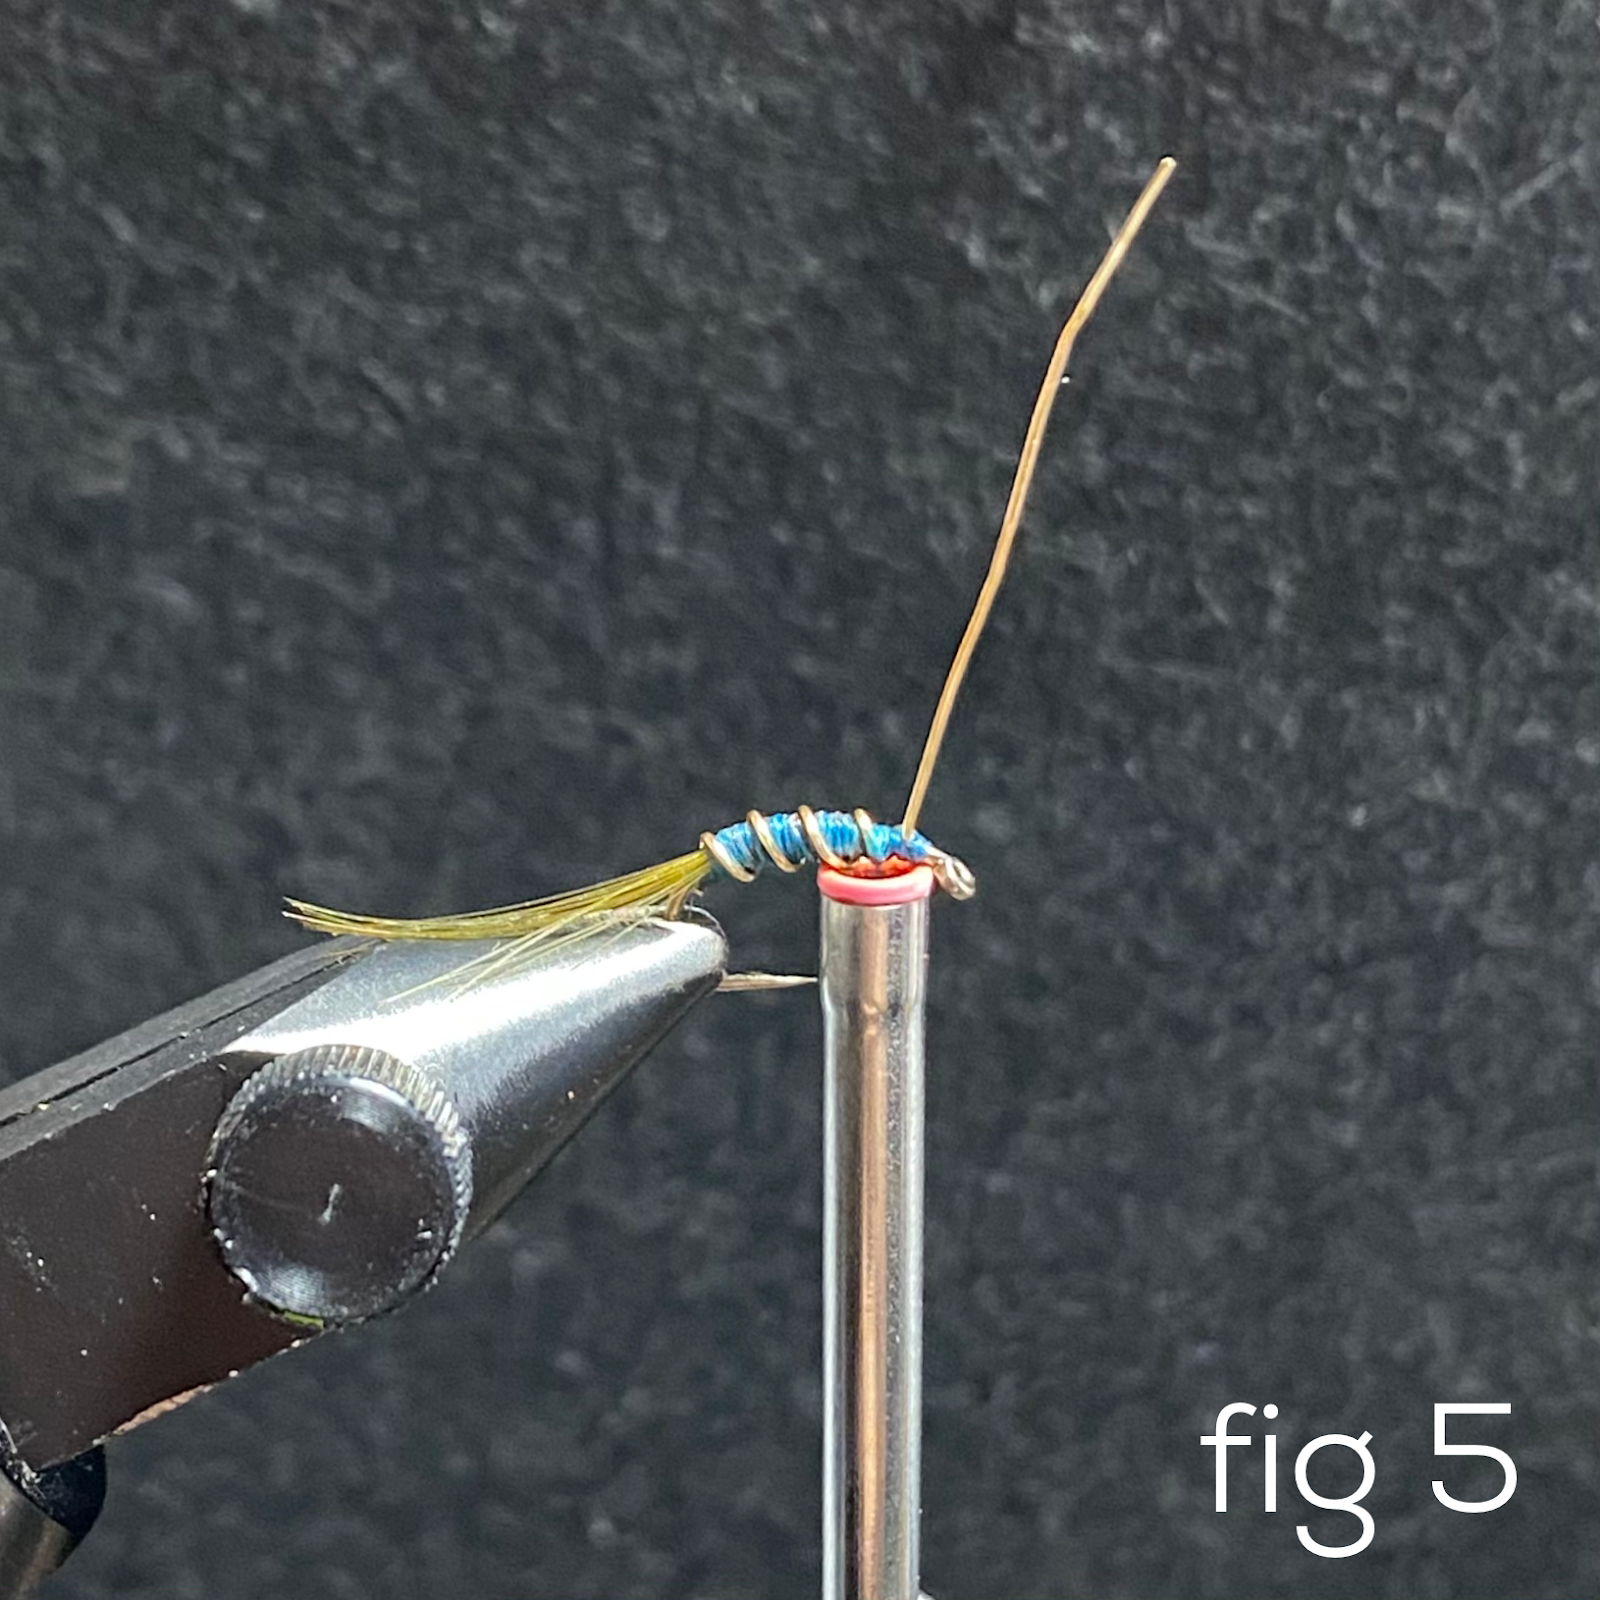
FIG 5 – Wrap your gold wire reverse, bringing it first around the bottom of the tail, so that the shape of the tail doesn’t become pressed and compromised – similar to wire-wrapping a pheasant tail nymph. End with your wire around a quarter to a fifth of a hook’s length behind the hook eye, pointing up, and secure with several thread wraps in front and behind.
This creates an excellent little saddle into which you can later introduce your hackle feather. This saddle also solves the common problems of: having an even taper, tightly securing your hackle rachis, and not having a sometimes inevitable whip finish that presents a thicker collar than intended – a trifecta of issues where you can typically achieve success on two, but not all three points of that shitty decisions triangle. This additional saddle room allows for more room to manage all three without sacrifice. Helicopter or snip your wire. Finally tie off your first thread and remove it.
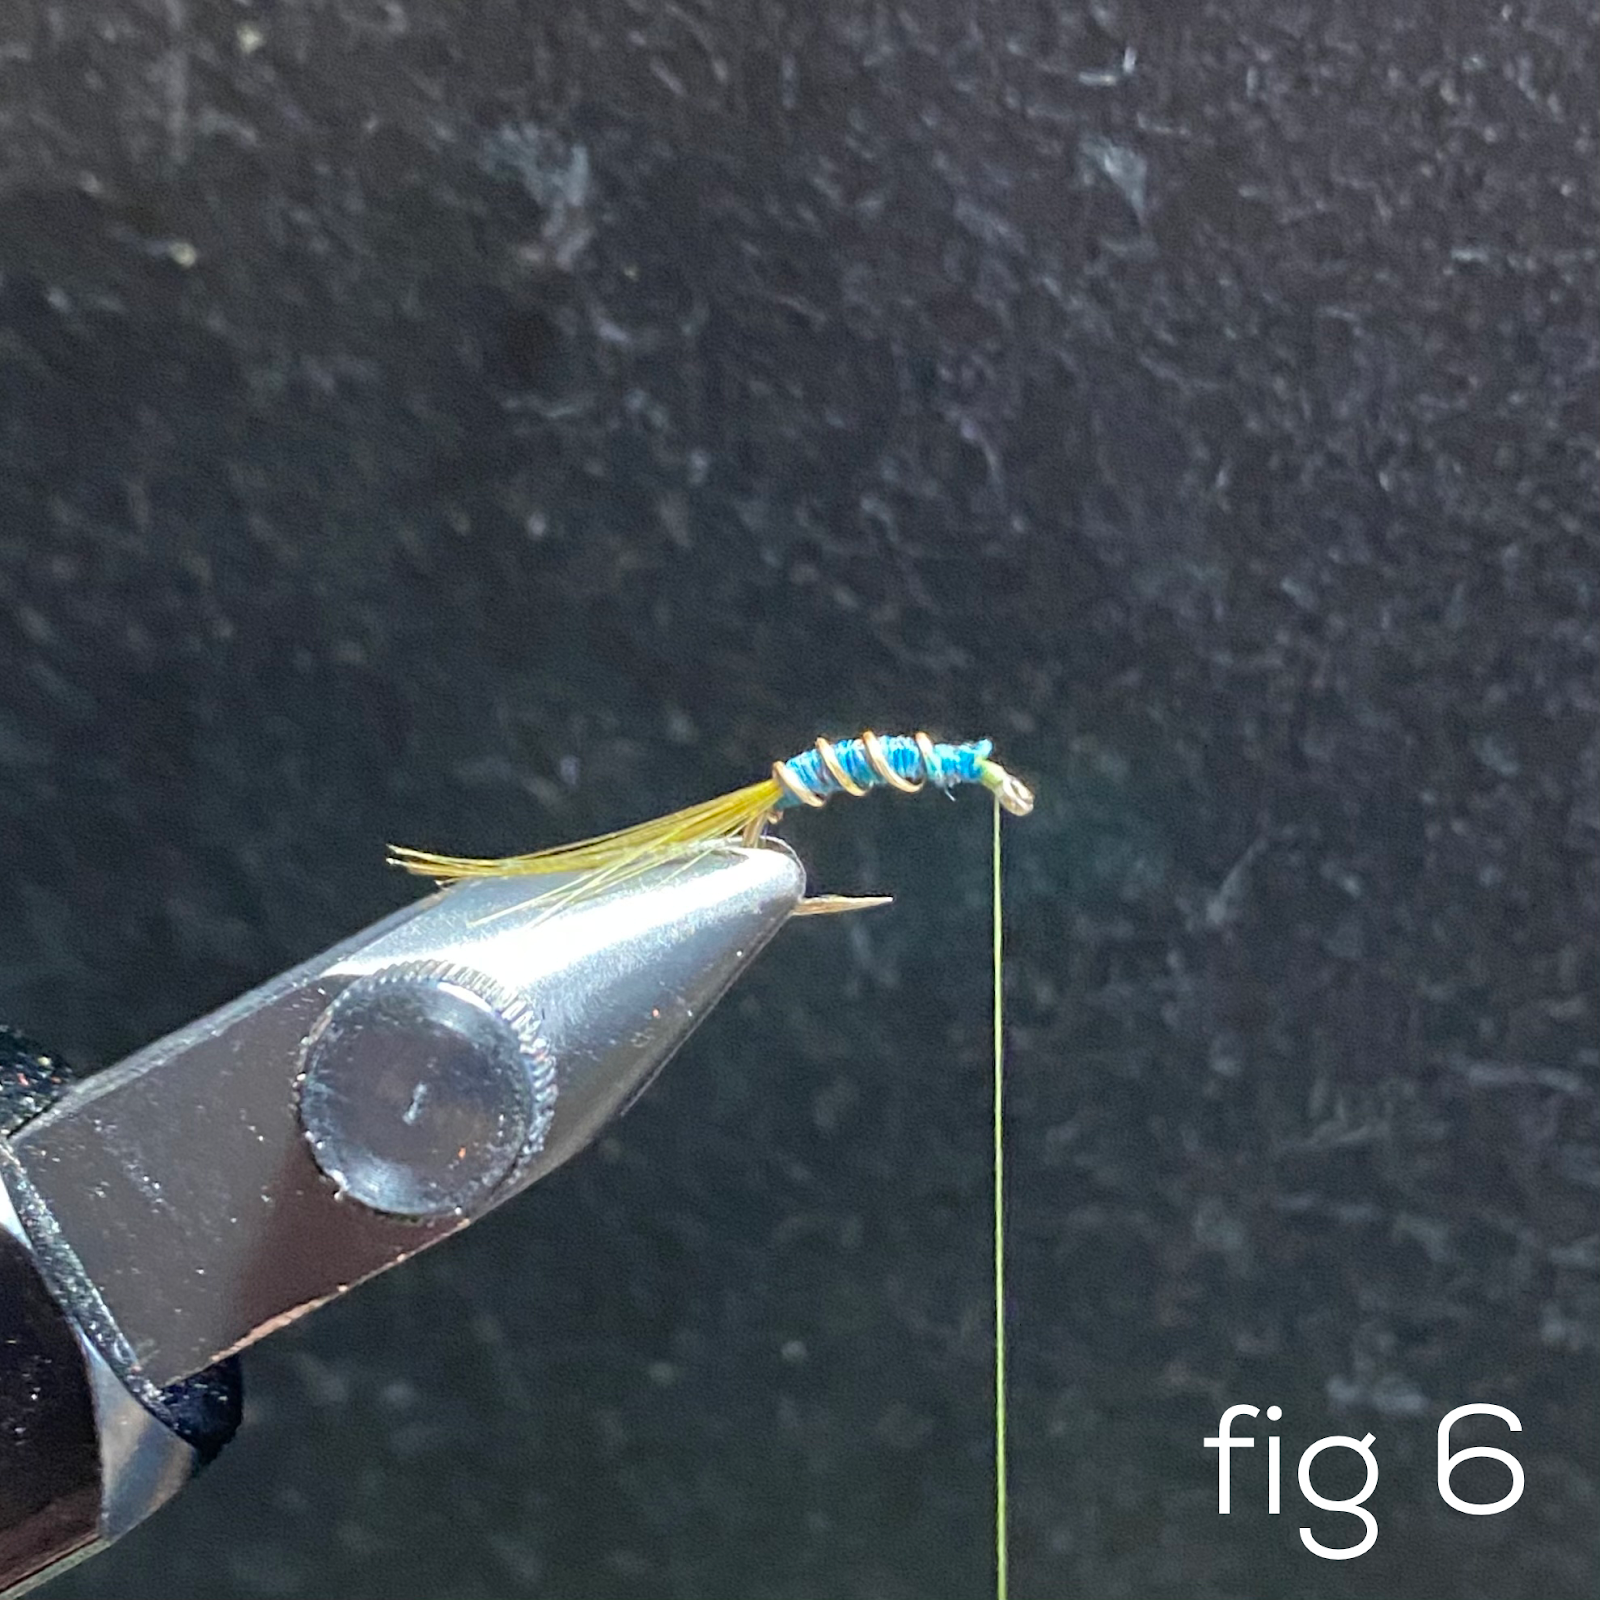
FIG 6 – Tie in your second thread behind the hook eye and build your head. Wrap your body back to about halfway the hook length or to wherever you would like your colors to separate.
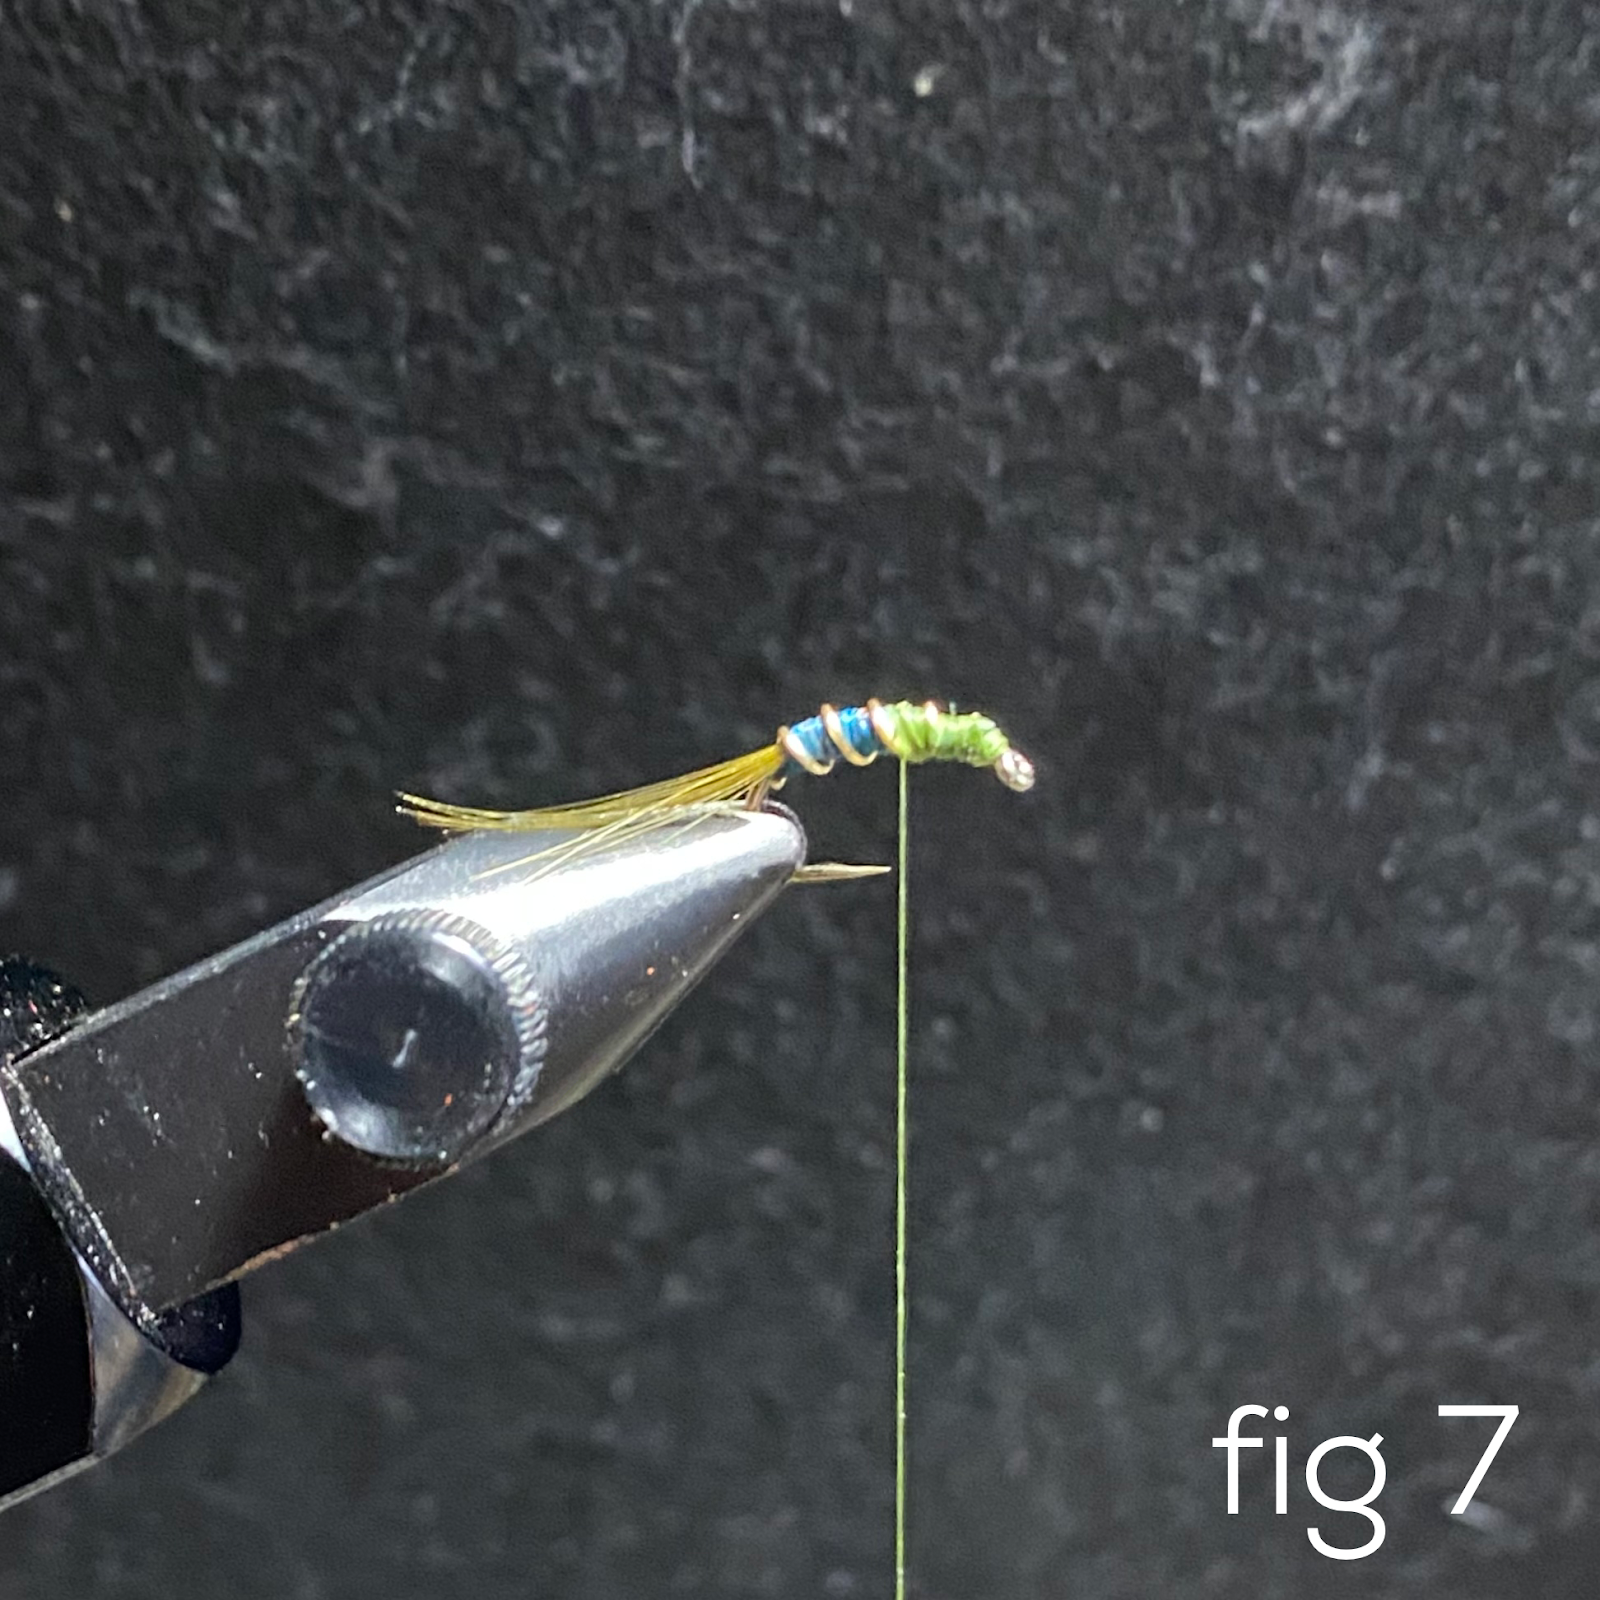
FIG 7 – Color separation with an even body taper.
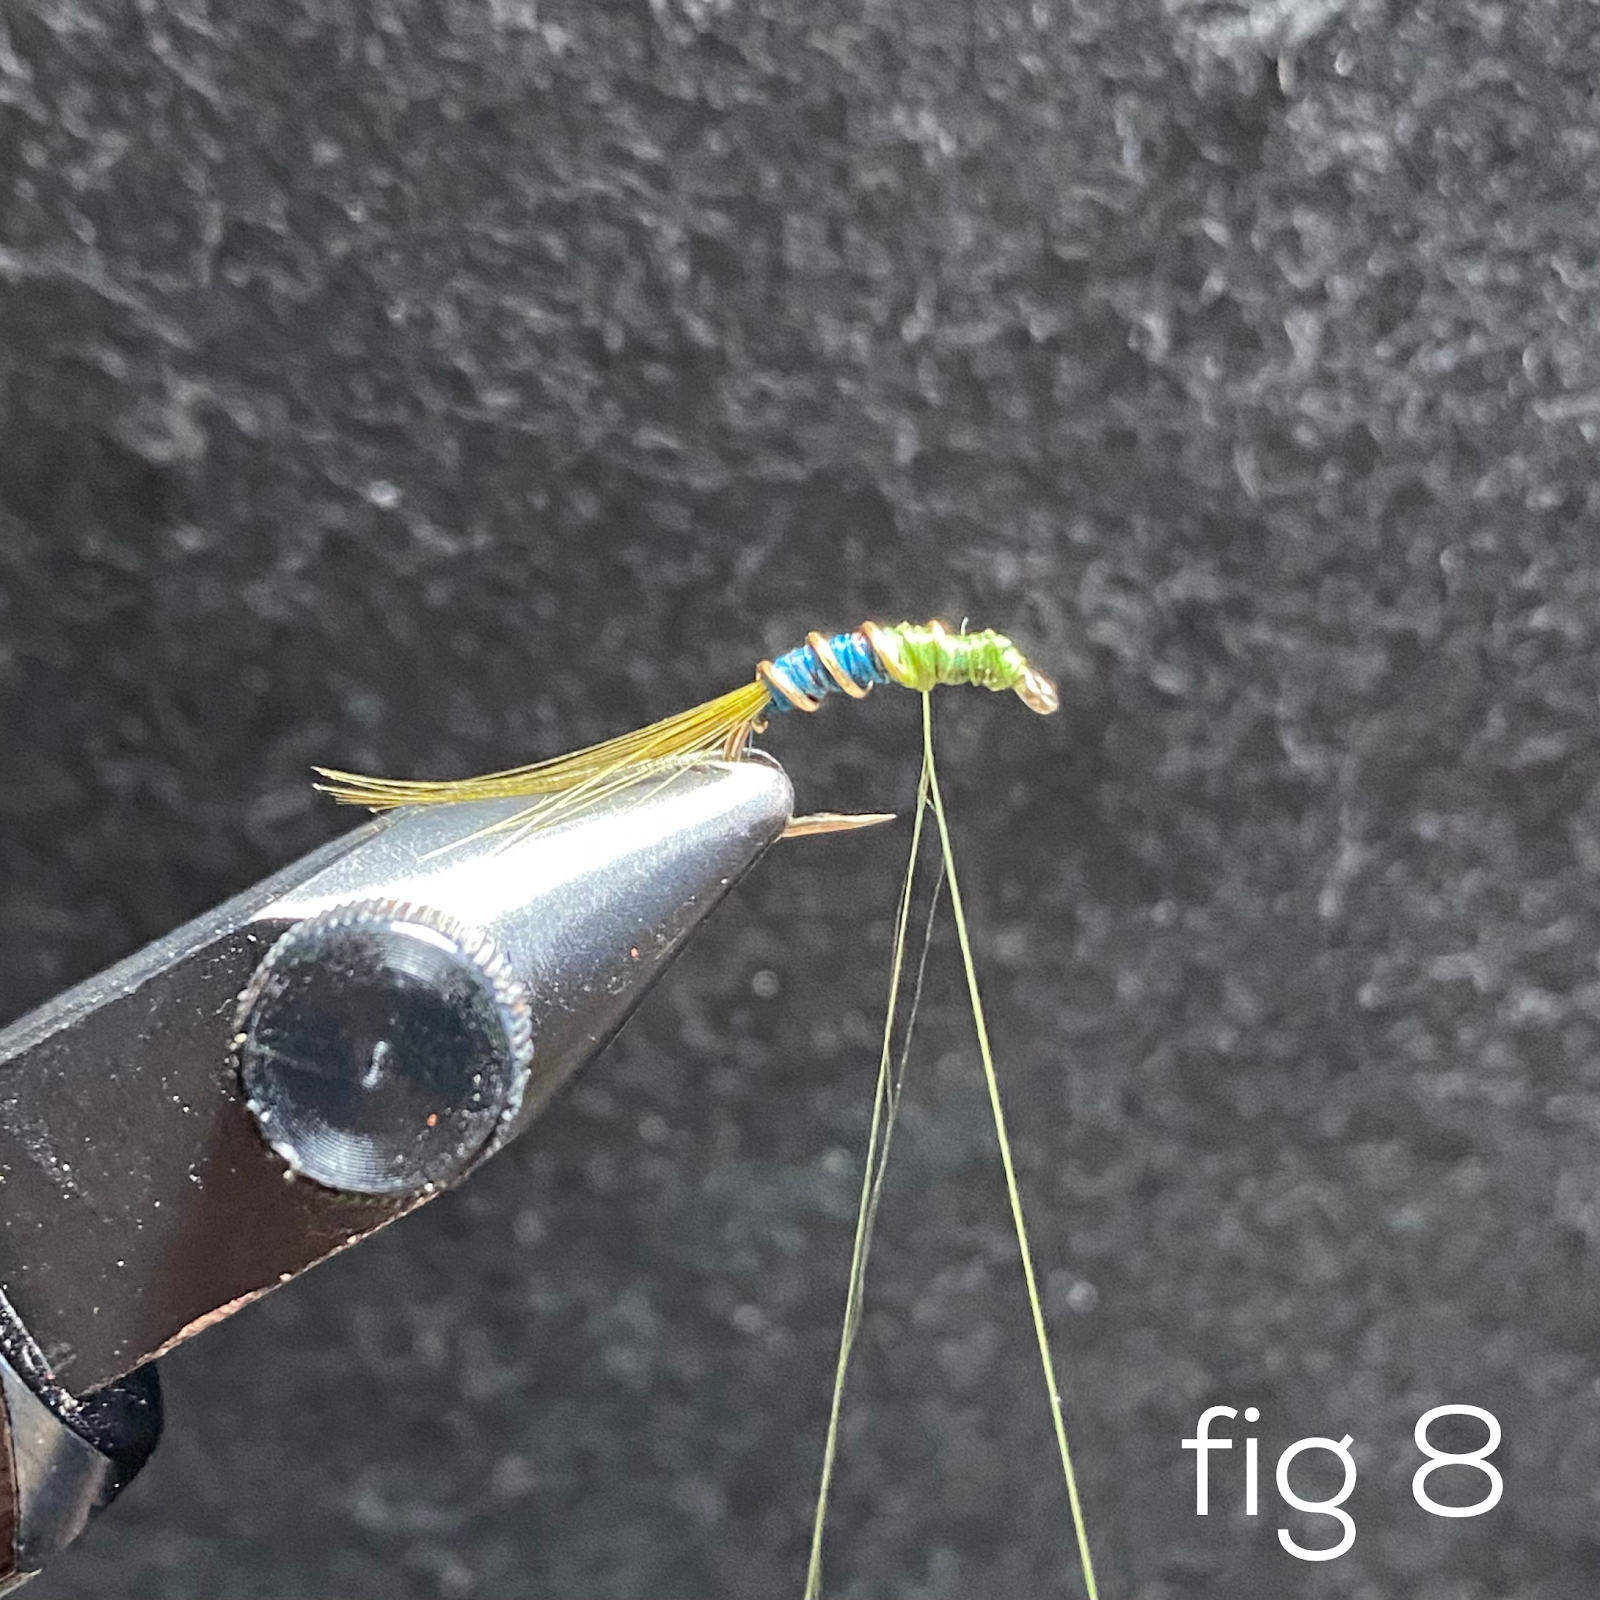
FIG 8 – Split your tying thread with a bodkin to create a loop. If using wound thread, you may have to spin counterclockwise in order to flatten it out. Wax or not, it’s up to you. I don’t typically apply wax to my emergers. Introduce your thin wisp of a dubbing noodle to the loop and close the loop, trapping the dubbing noodle between the thread.
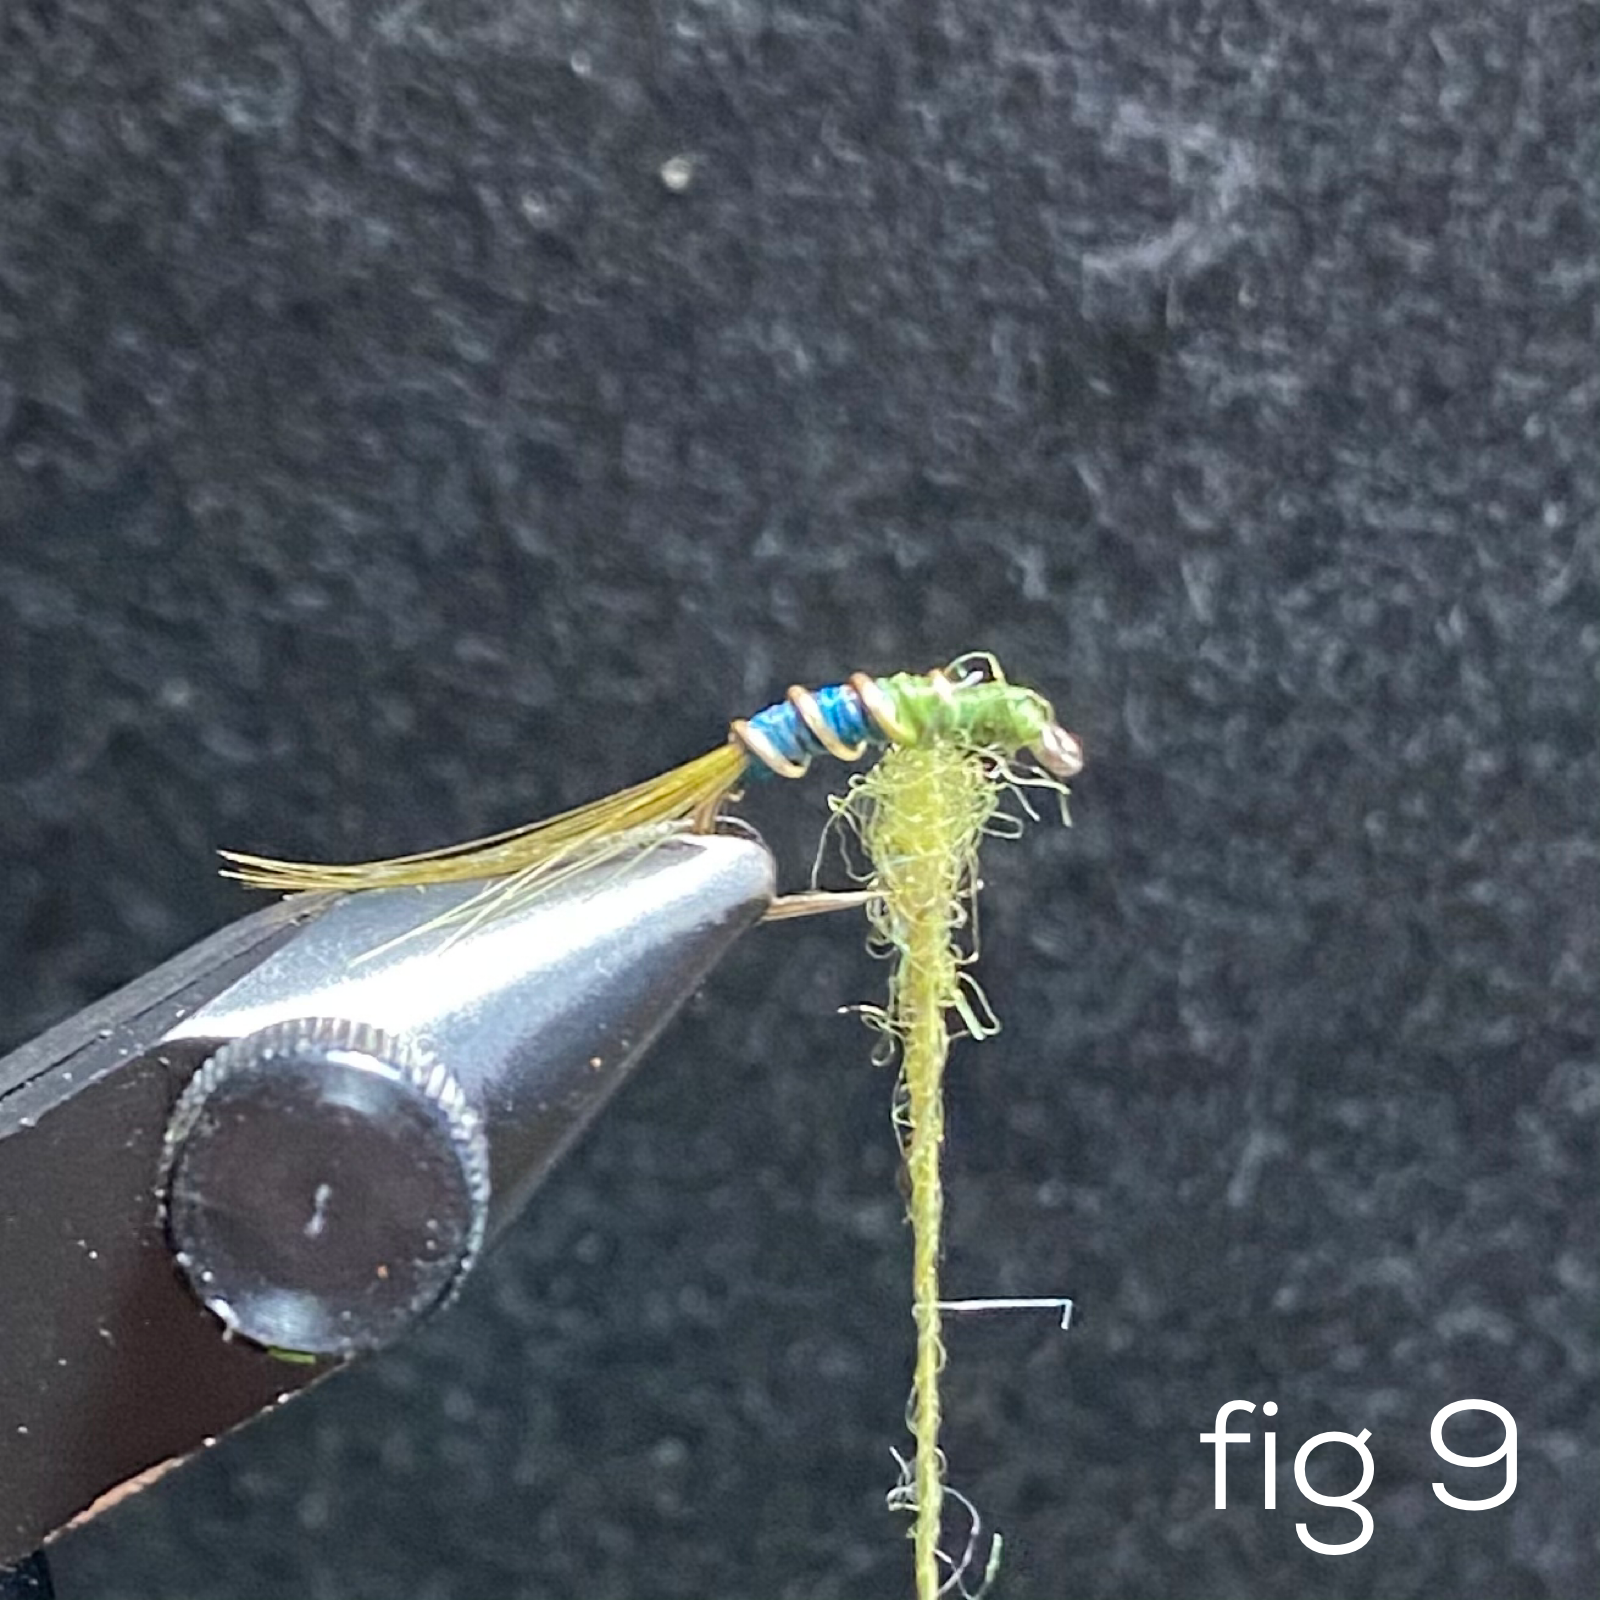
FIG 9 – Spin your thread clockwise to capture the dubbing and apply however many wraps you decide are appropriate for your body proportions. Typically 3-4, in my experience.

FIG 10 – Bring your thread back against the dubbing, if necessary, creating a wall of fiber that should be vertically inline with the left shoulder of the saddle you created earlier between the last full turn of the wire and the vertical nub it left when you removed it. Now advance your thread a turn or two forward and let it hang in the valley of the saddle.
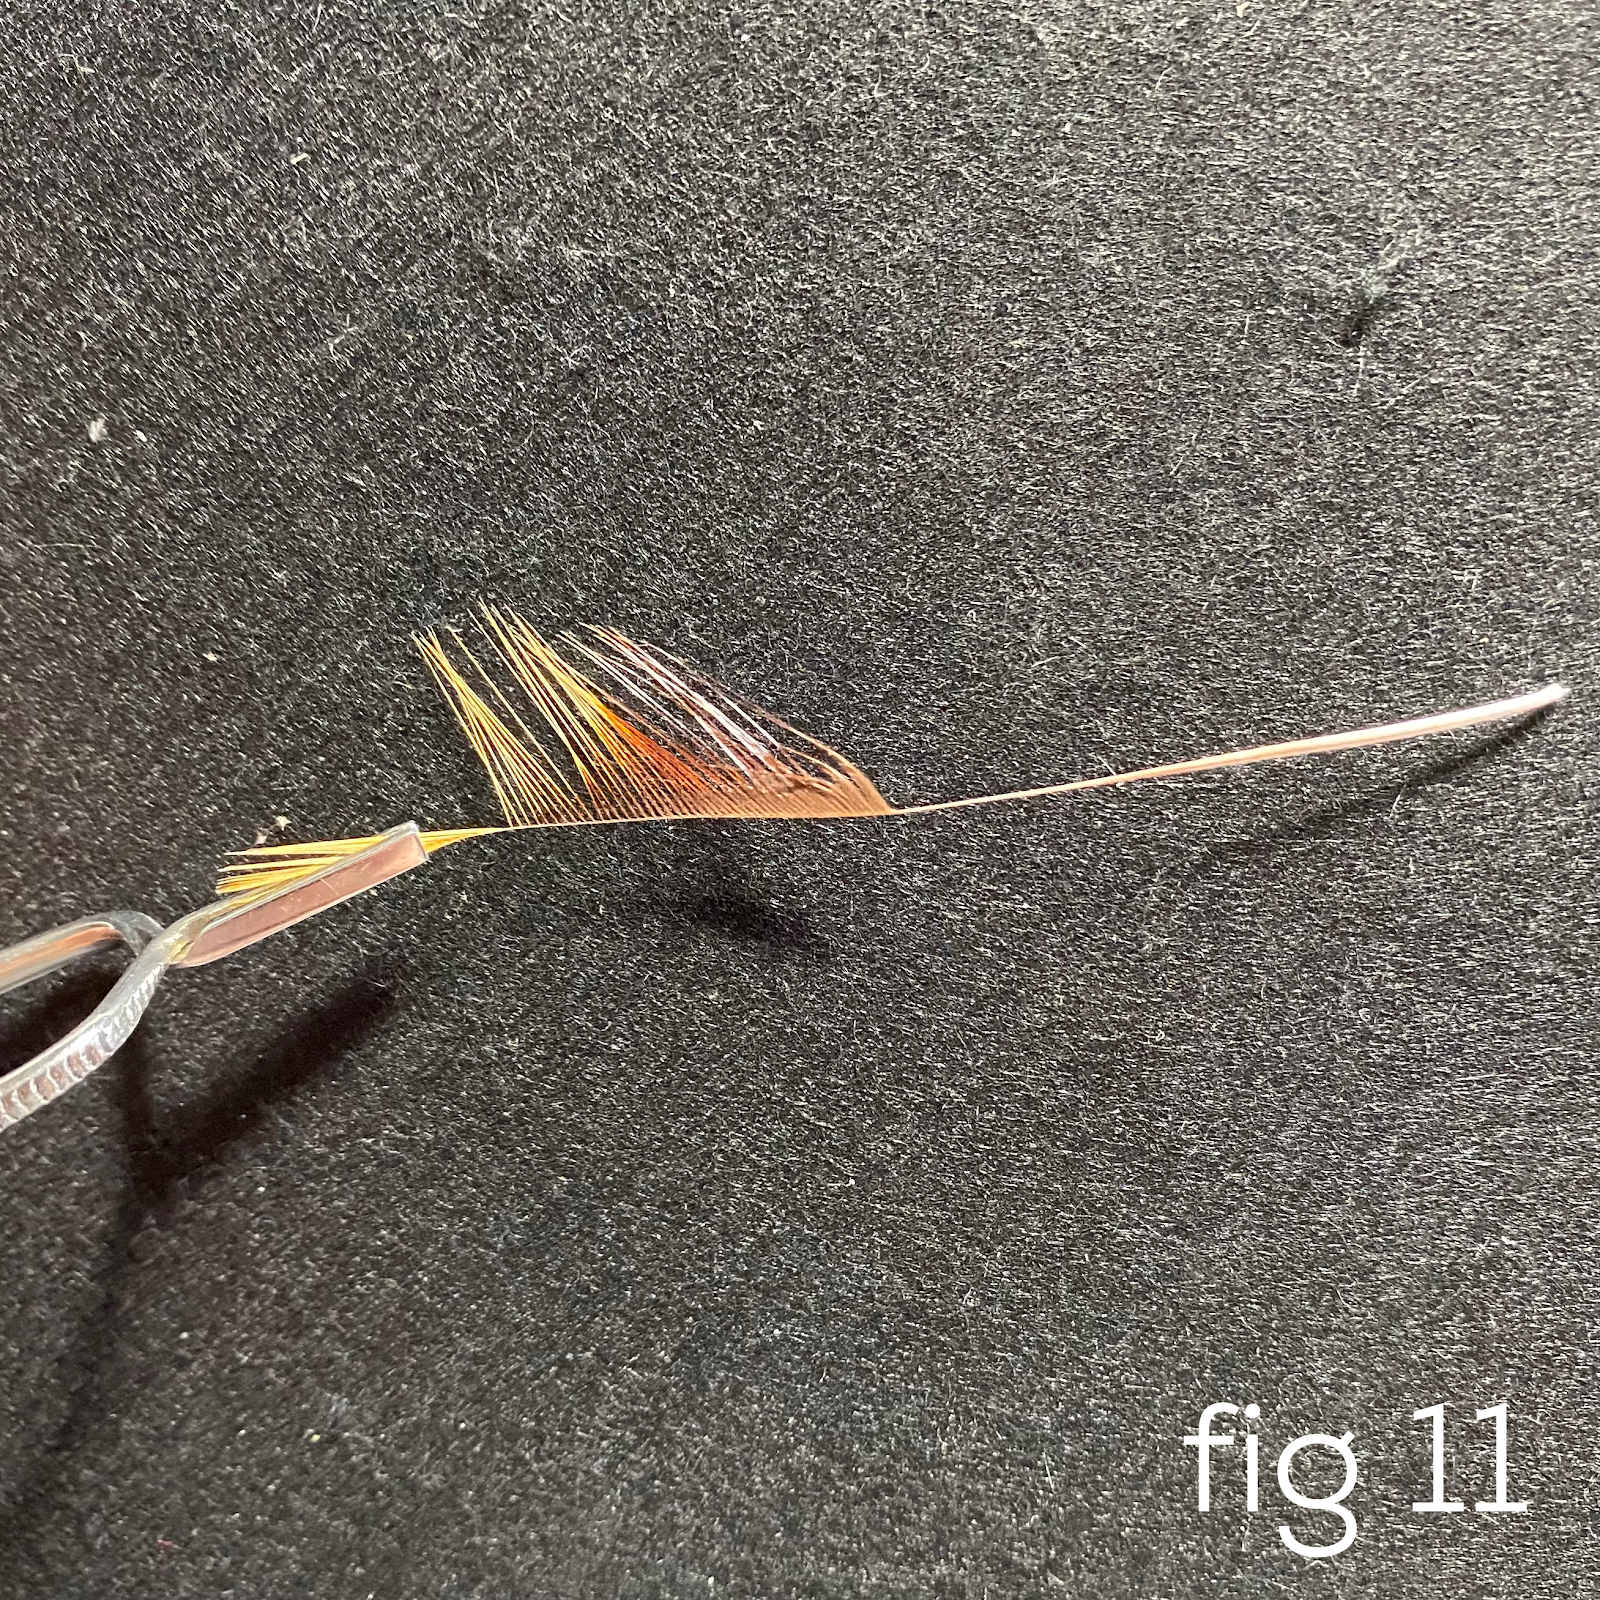
FIG 11 – Select a dry hackle feather of your choice and prepare it like so. (This also ties really well with golden hen hackle if you prefer more of a sinker.) The feather is face up.
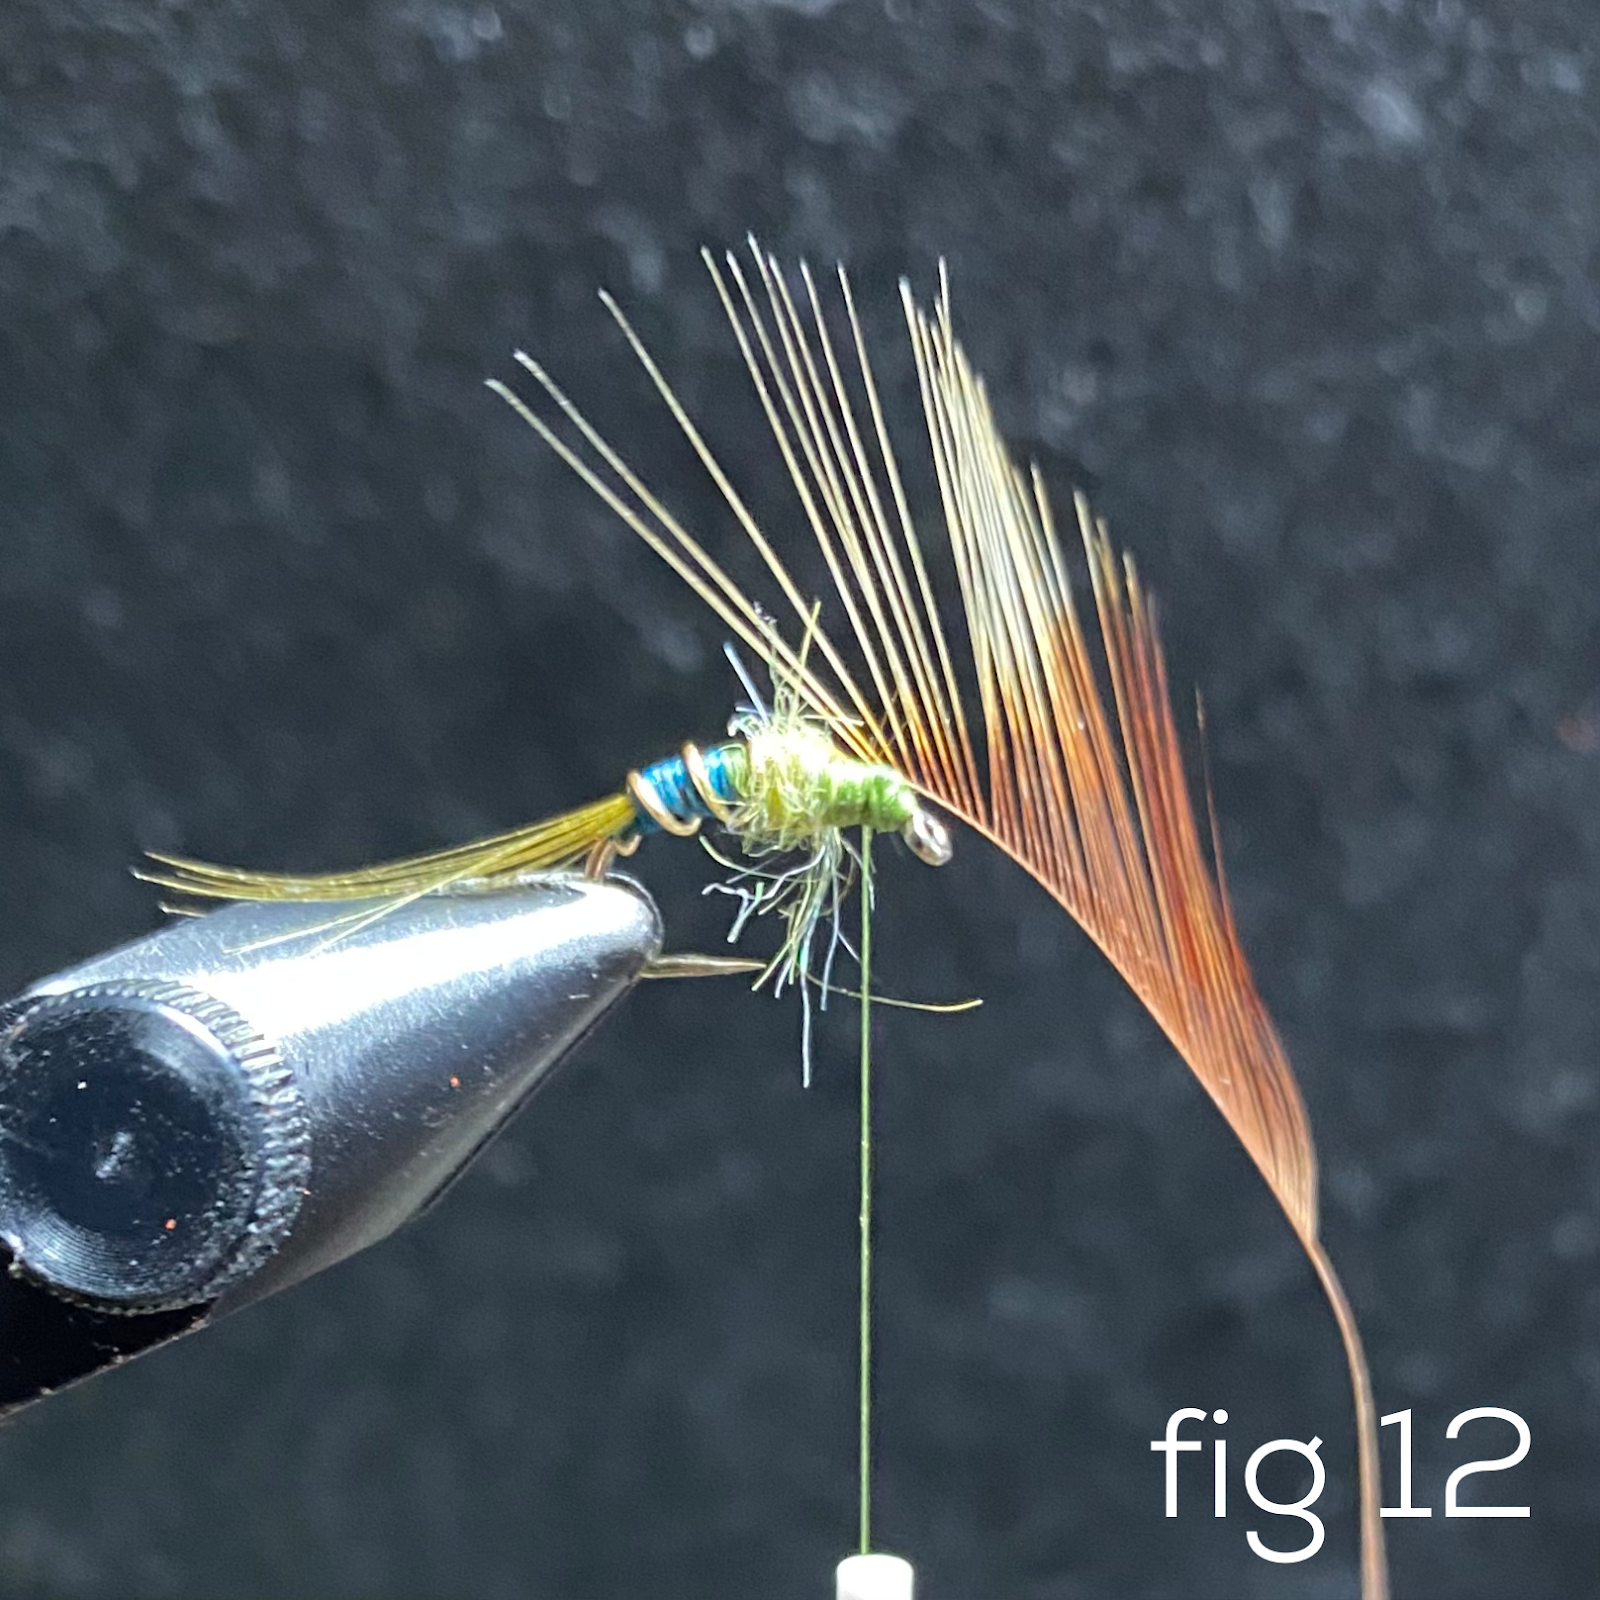
FIG 12 – Tip-tie in your feather. I tie in with the rachis lying approximately 15 degrees, almost vertical, across the saddle. That way, when I apply the first couple of thread wraps, the thread pushes the rachis against the hook shank inline with where I already want it to be. Now with the feather laying nearly perpendicular to the hook shank, I can more easily secure it with a thread wrap in front and behind the feather. Whatever you do, make sure that your thread is behind the feather before you begin wrapping the hackle.

FIG 13 – Wrap your hackle around the hook shank slowly and evenly, making sure that you are not trapping the fibers and that each new turn of the hackle is both behind the previous wrap in front of it and also still in front of your tying thread.
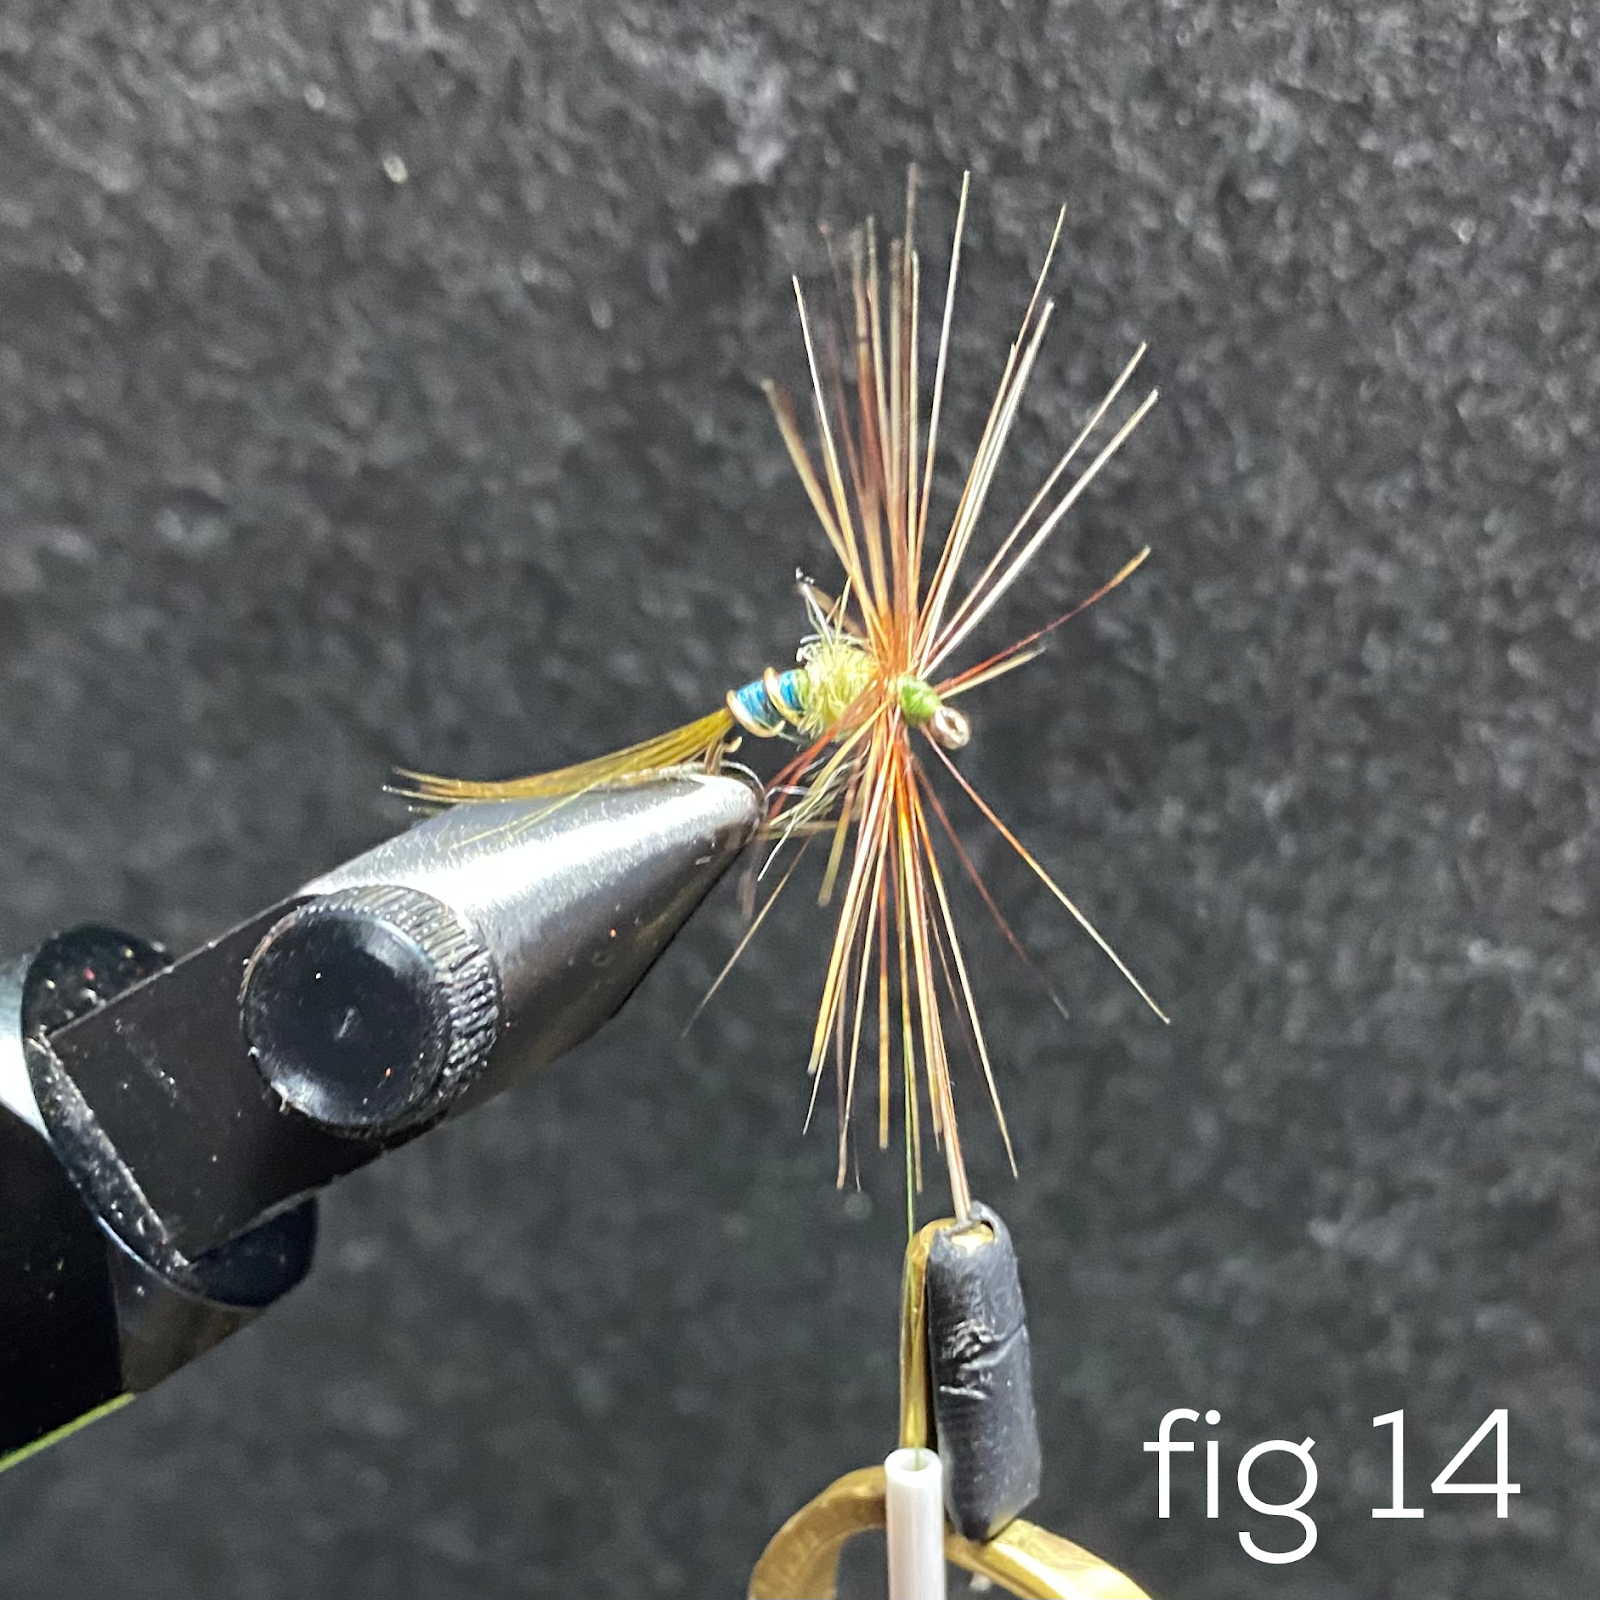
FIG 14 – Completely wrapped hackle with the bare rachis exposed and ready for tie in.
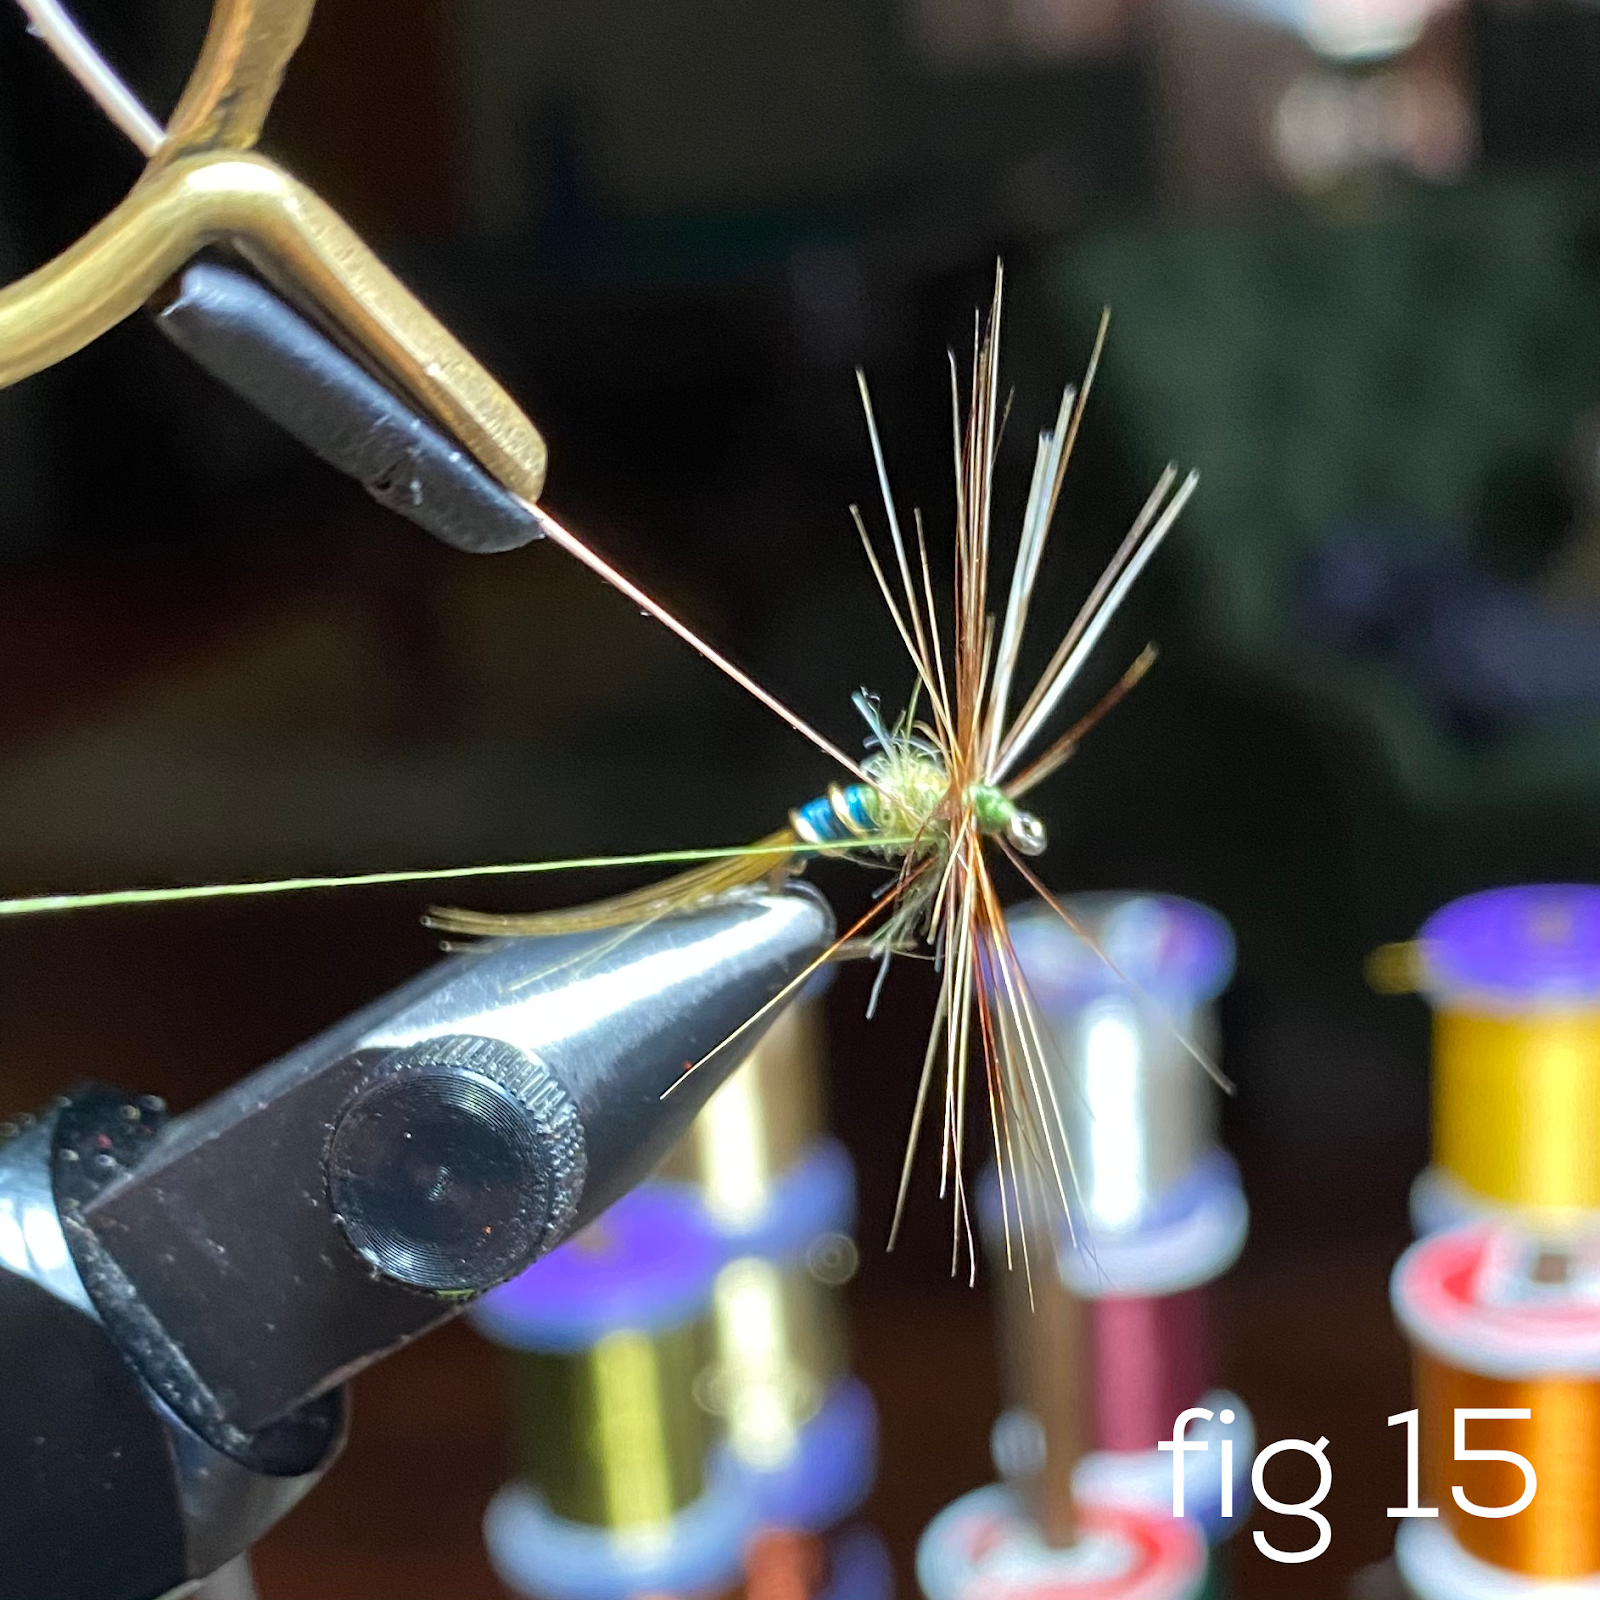
FIG 15 – Pull your rachis up and back against the body of the fly at around 315 degrees and secure with two or three good wraps. Snip off the rachis.

FIG 16 – Optionally, Gently gather and pull your hackle over the head of the fly and add a couple more turns of thread to bring the fibers forward. Whip finish between the hackle and the dubbing.
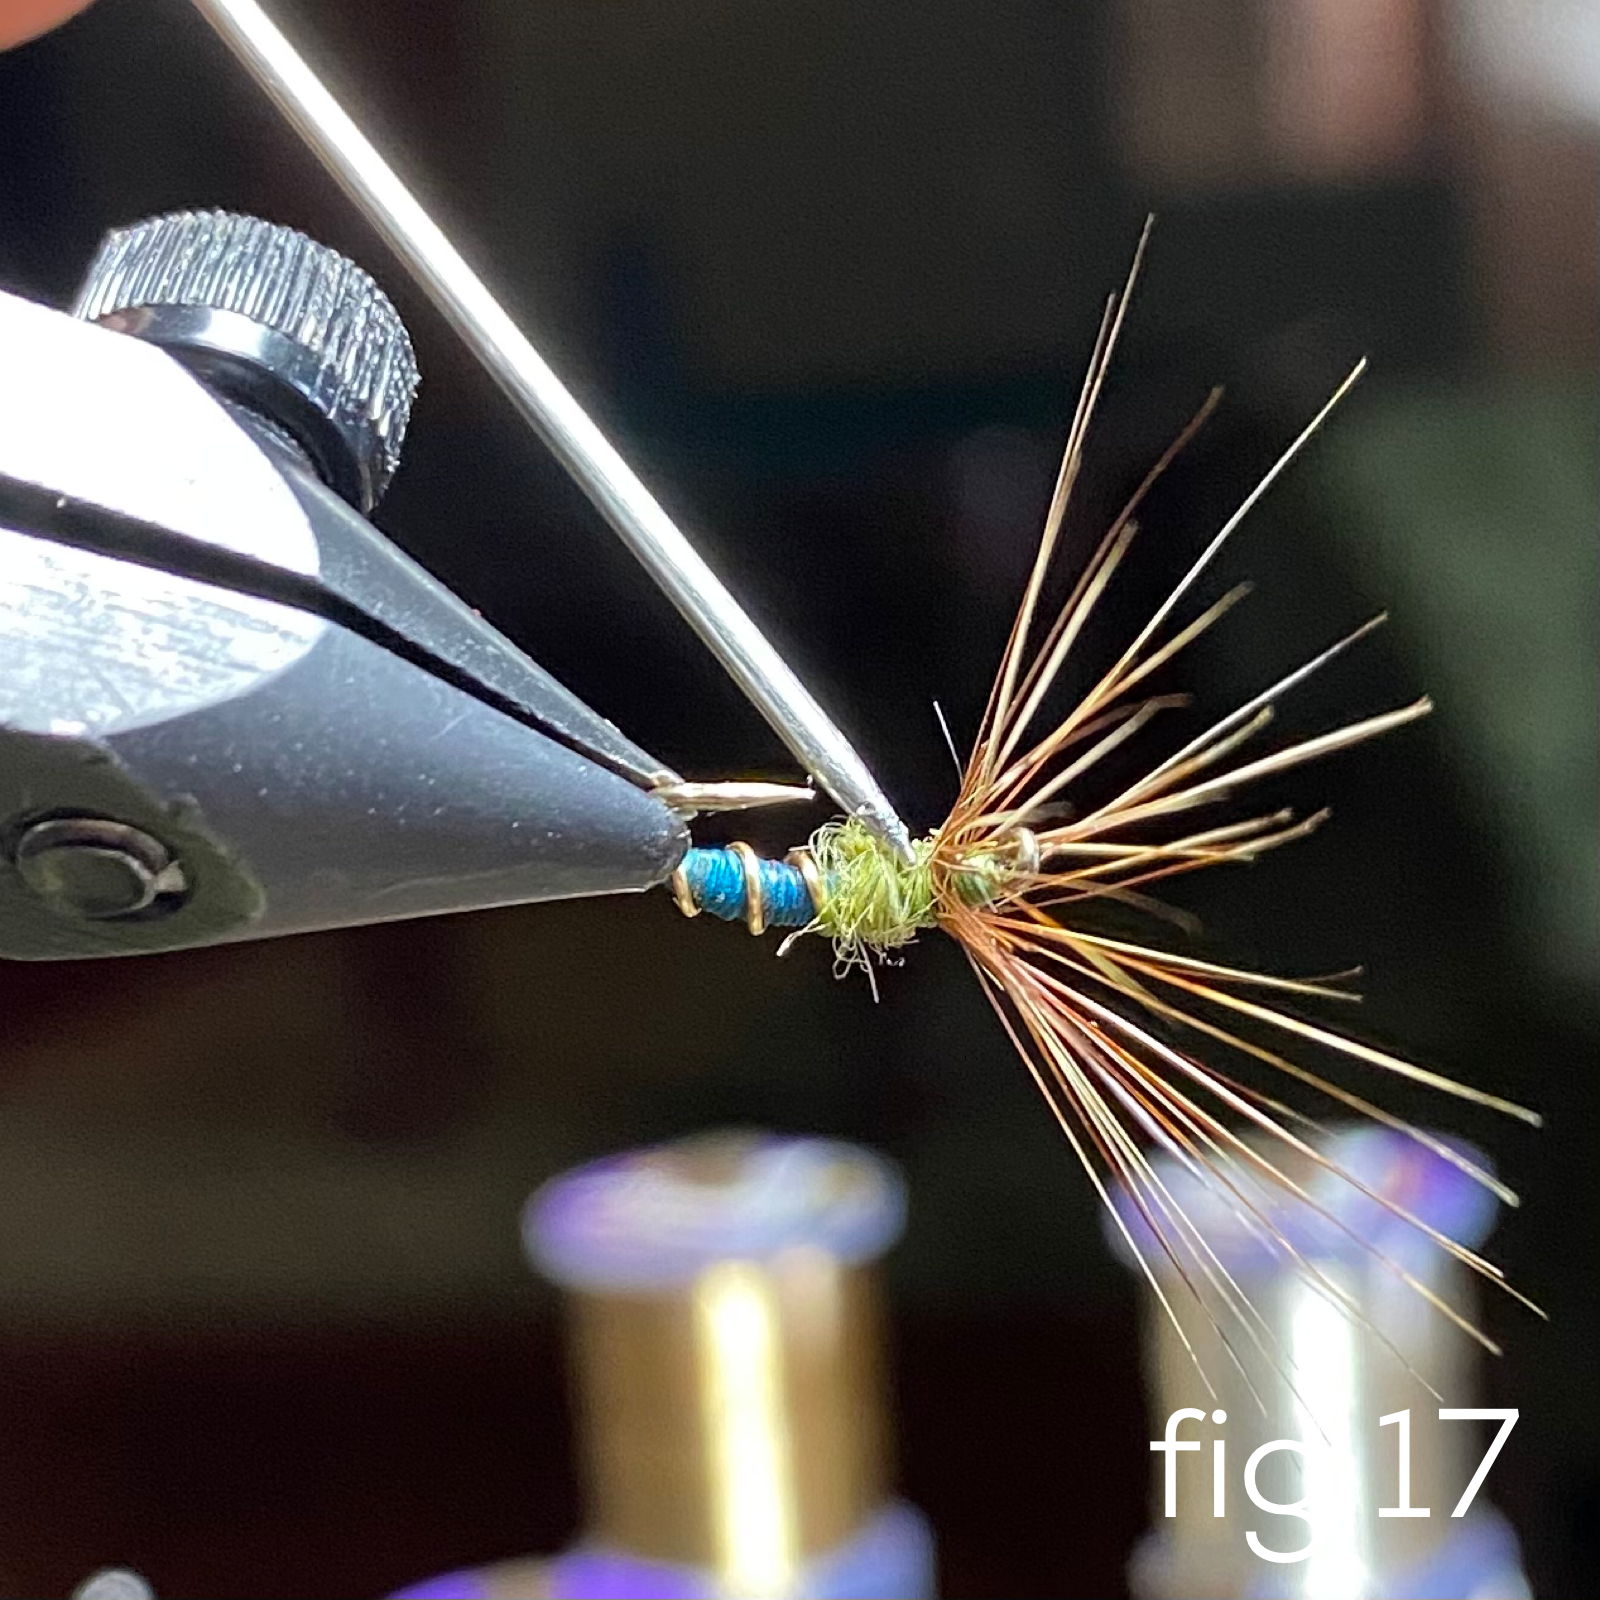
FIG 17 – End with a drop of head cement or whatever adhesive you prefer to the knot work and that’s a wrap!

Aaron E Fleming is a retired US Infantry Marine, owner of Hillshire Flies & Tenkara, pro fly tyer, and aviculturalist. His work has previously been featured in Tenkara Angler.
Do you have a story to tell? A photo to share? A fly recipe that’s too good to keep secret? If you would like to contribute content to Tenkara Angler, click HERE for more details.
When you buy something using the retail links within our articles or Gear Shop, we may earn a small commission at no extra cost to you. Tenkara Angler does not accept money for editorial gear reviews. Read more about our policy.