

D.I.Y. Tutorial by Steven Maichak
We’ve all done it – picked up a shed antler thinking we would use it to create some sort of unique craft we could use in the field. More often than not, however, it ends up in a box full of the various sheds we’ve collected through the years. In the end, it just sits in a corner collecting dust as we start to fill up a second and third box of sheds.
Not Anymore!
Today, I will show you a simple way to make something all stream anglers should have – a landing net. Follow along as I present a simple tutorial that shows you how to turn that impressive shed into an even more impressive, one-of-a-kind conversation piece that will make all your fishing buddies jealous.
| Materials: | Tools: |
|---|---|
| Shed Antler | Drill with several different bits |
| #18 Mason Line | Measuring Tape |
| Tape of Some Sort | Pencil |
| Paracord | Scissors |
| Carabiner | Lighter |
Step by Step

First, you’ll need to select a deer shed that offers a sufficiently large handle and enough open space within the rack to allow you to land a fish. The shed I chose happens to be from a mule deer. A white-tailed deer shed would suffice but might require you to remove some of the inner tines.

Second, mark the areas toward the tips of the tines where you’ll drill through with small drill bits. The holes should be spaced far enough apart to prevent them from running into one another or creating weak spots where chips and cracks can ruin them.

Next, proceed to drill your holes through the tips of the tines at your pre-marked points. It is best to start with small diameter bits and gradually increase to larger bits to prevent cracking. Slowly increase the hole diameters until they are just large enough to allow you to pass your selected cordage through the tines.

Proceed to feed your cordage through the holes you drilled in each tine. I chose #18 mason line. I recommend twisting your selected cordage between each tine to increase both the diameter and strength as it will serve as an important foundation for the strands you will later use to create the actual net. Knot the ends in your preferred manner on the outsides of the outermost tines.

This image shows what your net will look like once you’ve completed the process of running your cordage through the tines. At this point, you now have a completed a perimeter that will allow you to begin tying on strands of cordage for the weaving process.

Before moving on to the next step, I thought it would be good to show you this angle of the antler. You can see how dramatic the curve of the shed is by how sharply the cordage is forced to change direction. Fortunately, this matters less than how large the interior opening is within the shed.

This angle shows the two outermost tines and the fork at the base of the antler oriented on essentially the same plane. When this occurs, it allows the net to act as a scoop when landing fish with the cordage between the two inner tines held parallel to the water’s surface. Though this was not intentional, I’ve found it works nicely and recommend you select a shed with a similar arrangement if you have the option.

The next step is marking where you will drill through the main beams as well as where you will tie the net strands onto the perimeter cordage. You can see where I’ve drawn my intended outline as well as where I’ll be drilling into the shed, indicated by the small perpendicular marks along the outline. I recommend using pencil for easy erasing afterward. Ink from a pen or marker will saturate into the antler and be difficult to remove.

This is what my shed antler looked like after I drilled through at the designated spots. You’ll need to consider how tight of a weave you want before determining how many strands you’ll need. A tighter weave means more strands. Tying knots is a bit tedious, so consider the size of the fish you typically catch before committing to an ultra tight weave.

This image shows all the strands ran through the antler as well as those secured to the perimeter cordage using simple slip knots. You can see each hole within the antler has two strands running through it. Each strand hung down roughly 2.5 feet before I started tying knots.

I wove the net using the method presented in East Woodland Survival’s YouTube video. I found it to be simple and straightforward without the need for any specialty tools. Once I approached the ends of my net strands I counted them and ended up with 34 (I had to remove a few during the knotting process as the net tapered down). I then went through all the strands in succession and labeled them 1-17 to create matched pairs that were exactly opposite one another.
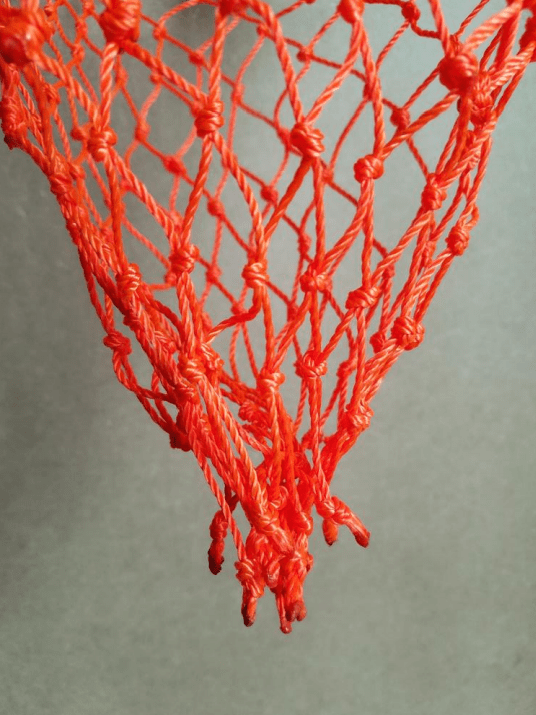
From there, I proceeded to knot each matching pairs in order from 1-17. Feel free to use whatever knot you prefer. In any case, I recommend using a lighter to melt the loose ends together to prevent the strands from fraying and keep your knots from coming undone. The end result is a bit ugly, but the layering of knots from opposing strands means at least half of them could come undone before I start experiencing issues with fish slipping through the bottom.

Next, I recommend creating some sort of wrap for the handle portion as the antler can be a bit slippery when wet. My shed also happened to have distinct, deep ridges through that section that did not improve my gripping purchase, but instead were a bit uncomfortable. I chose to use paracord and the easy yet effective method shown in CbyS Paracord and More’s YouTube video.
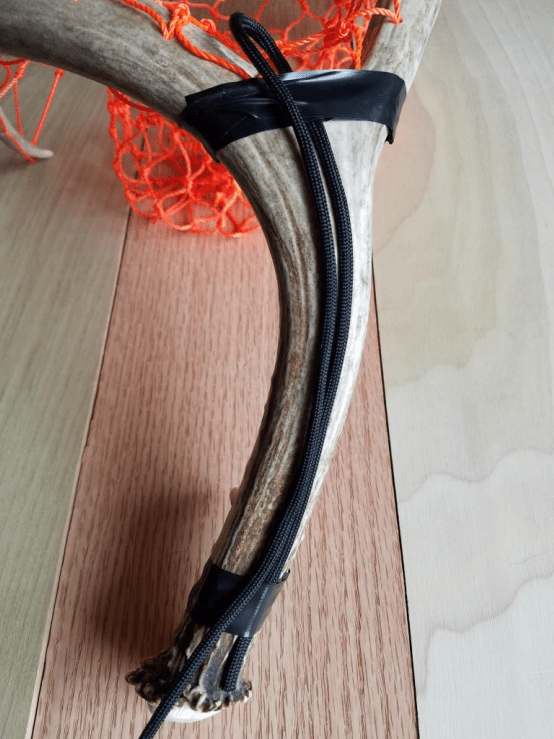
You can see how I allowed the curvature of the antler’s base to determine how the paracord laid on the handle for a more fluid presentation. The electrical tape served as a third hand to help me keep that base strand taught as I wound the loose end around the shed.
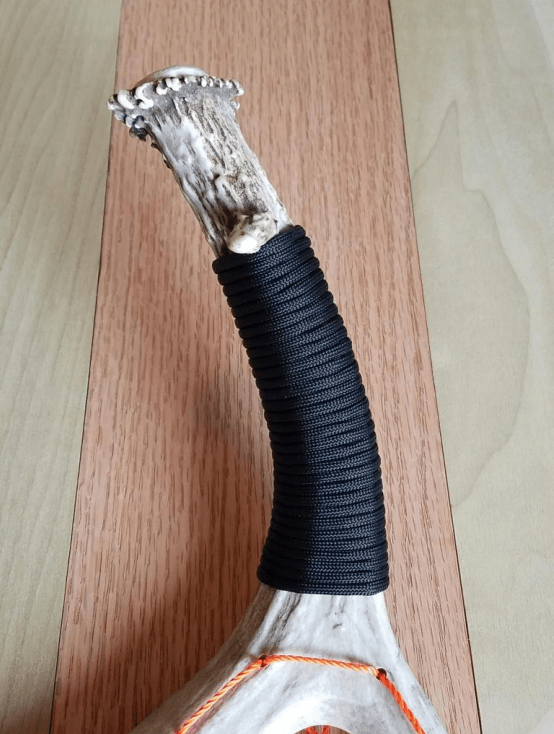
If you decide to use the same material and methodology as me, I recommend wrapping the paracord as tightly as possible to ensure it stays put well into your fishing future. Of course, using a lighter to melt the loose ends to the wrap will help to secure them even further.

Last but not least, you’ll want a way to secure the net to keep it handy but hands-free. I chose to drill another small hole through the base, run some scrap paracord through it, and add a carabiner. I also added a separate carabiner to the waist strap of my fishing fanny pack to serve as an easy place for the net to dangle by my side, always at the ready with a quick detach from either carabiner.
The Finished Product
Below, you can see my final product in all its glory. It might not be the lightest or most compact, but it is one-of-a-kind and lands fish as well as all the overpriced, mass produced landing nets. Aside from a few hours of my time, I was able to make this creation using materials I already had laying around the house. Just like my homemade tenkara outfit, this landing net helps to make each fish feel a little more special and each fishing trip a more memorable adventure.

Dimensions of My Net
- Overall length – 19”
- Handle length – 7”
- Outer circumference – 35”
- “Inner” circumference (between two center tines) – 31” ; 6.5” x 11.5”
- Net depth – 11”
- Hole diameter – 1”
Steven Maichak is a conservation field biologist and the writer behind Adventure Life Freelance (advfreelance.com). His fishing roots are in Oklahoma, but he first cast his tenkara line in the mountain streams of Utah where he now lives in pursuit of the state’s Cutthroat Slam.
To read additional articles from the Tenkara Angler 2020 Summer Showcase, click HERE.
Do you have a story to tell? A photo to share? A fly recipe that’s too good to keep secret? If you would like to contribute content to Tenkara Angler, click HERE for more details.
Discover more from Tenkara Angler
Subscribe to get the latest posts sent to your email.